Before we get into the meat of this week’s update I just have some big news about Kana Quest. Officially Kana Quest is going to be heading to PAX Aus this year! If you are planning on coming come say hi and give the game a go! I would love to hear your feedback! And if you have any friends going tell them to check Kana Quest out! Anyway with that done, onto the week’s work!
So this week I’ve been working on implementing the second world into Kana Quest. I’ve known for a while that I want to transition between worlds by clicking and dragging the screen. And for the background art to join up seamlessly. So what’s the process of doing this involved?
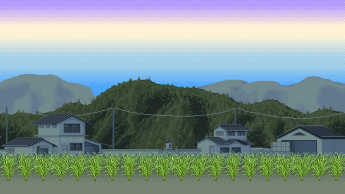 Step one was making the background art for world two. This was the easy part. All I really needed to watch out for here was to make sure that all the layers are repeatable so I can make the world as long or short as needed.
The next step was ensuring that the two worlds can transition into each other. This step will be easier in the future thanks to more planning in the world two art but no such planning was done for the first world’s art. As such the seam is a little abrupt. But its not an immediate shift so its better than nothing.


Part three was bringing the assets into unity and getting the camera to move when the player clicked and dragged. One small bug occurred with this though. I made my camera a physics object. Turns out any child object of a physics object loses its ability to know if the player is clicking on it. This caused some of my menus to stop working.

Once we had the camera moving we had to get the background parallaxing with the camera. This means that the foreground art will move more than the background art to create the illusion of depth. This turned out to be troublesome as I kept being able to make my world two art not line up with the first world art. Thus forcing me to find a way to ensure that the art would always come back to the right position. This took half a day. It was not fun.
So here we have the last part of getting this whole thing working. The transition. This gave me the most trouble out of everything and is what I spent most of this week working on. The reason is for the first world I had used a static overlay that would fade in OVER everything in the scene. This overlay would work fine as long as the overlay was the exact same as the background. But once you add a variable camera position you no longer can guarantee this. So things had to change. So now, what is happening is I have a script that finds all the visible parts of the background, and prevents them from being destroyed when a new scene is loaded, then it moves those objects into the same relative position as they were in the previous scene. This is important as the camera’s position changes scene to scene so if this didn’t happen the art would be misaligned, or not in shot at all. Then would take all other objects in the scene and fade them out. Once the new scene is loaded it would get all the new non-background objects in the scene set the transparency to full and fade the new objects in. The result is what you can see below.

And that was the process involved in adding the second world to the game. All subsequent worlds will be easier as I won’t have to worry about making the last three steps all over again. It will be set up for me already! Anyway I hope you all enjoyed learning about my process.
Till next week.
