Archives for posts with tag: Educational Game

Morning all, hope you had a restful break over the holidays. But unfortunately it is the new year and that means getting back to it. And for me that means writing more devblogs.

So welcome to the Kana Quest devblog for January 2020.

trailerWIP2

If you’re new here, Kana Quest the game that I’m making. It’s a cross between dominoes and a match-3 puzzle game… but it teaches you how to read the Japanese alphabet. I designed over 300 levels for this game and because of that I feel as though I have some idea of what I’m doing when it comes to designing puzzles. So for this month’s devblog I am going to go over my Top 4 favourite bits of puzzle design advice.

4. Learn How to Manage Complexity

So within any game you are going to have complexity. Traditional game design says that you want to keep the game’s difficulty within the “flow channel”. Basically, don’t let the game be too easy or too hard, difficulty trends upwards as the player gets better, but you do have fluctuations of difficulty over time. I mostly use the word complexity over difficulty here because I find it is complexity that produces difficulty. However, there are different types of complexity to consider. The three main types of complexity are:

  • Complexity of given information
  • Complexity of “solution” or “win state”
  • Complexity of execution

Lets quickly define these in a bit more detail.

Complexity of given information, is the amount of information the player has to process. For an example. If you are playing Magic or Hearthstone, if your opponent has a 1/1 creature, no cards in hand, no trap effects and they have 1 life left. And then you have a spell in your hand that deals 1 damage to anything, you have very little complexity of given information. In this example, you have two possible actions. One will win you the game, the other postpones the end of the game. Its very easy process all the information. And as a result, that is not a very difficult game state. But if we gave both players a full board of creatures each that have different effects and both players have full hands and full life… now there is so much for information that the player has to parse. This makes the game harder.

Complexity of “solution” is based off how hard it is for the player to figure out what their “win state” looks like. Many games have very clear and consistent win states. For example, a platforming game your win state is to get to the end of the level. It’s very clearly defined for the player. Puzzle games are somewhat unique because often the player does not know what the “win state” is when they are going in. Part of the fun is figuring out what the win state is. For example, if you sat down and started a crossword and you knew all the answers, it would not be fun. However sometimes, especially in puzzle games you need to be able to figure out what some elements of the end state look like in order to progress. If your “solution” is so complicated that it is near impossible to figure out what the end state looks like, then that often means a puzzle is way too hard.

Finally Complexity of execution. This is how difficult it is to execute the actions the player needs to do in order to win. For example, in a Souls-like game, you can often see what you need to do quite well, but executing that plan is often where the difficulty comes in. In puzzle games, how complex the specific order of actions must take to win, determines the complexity of execution.

Here are some diagrams on the breakdowns on the different types of complexities between genres

This slideshow requires JavaScript.

So, you might have noticed that for Kana Quest, the complexity of information is maxed out. This is because each game piece is a Japanese letter, and the player has to remember what each letter is in order to match the sounds between letters. Because of this, the average player has to mentally track what letter is what. What this means is that I cannot use complexity of information to up the game’s difficulty. If I were to try increase it, players simply would not be able to process what is going on in a given level. Because of this most of the time, when I am trying to make a more challenging level in Kana Quest, I usually increase the complexity of execution. Of course these complexity levels will fluctuate within a given game (turn 1 hearthstone has basically no complexity on any vector, but that ramps up significantly over a match).

The reason I’m bringing complexity up is that to make a good puzzle game, you need to know what vectors your game has a lot of naturally. And of course every puzzle game is different so you need to have a good understanding of the different types of complexity in order to properly manage it in your game. Puzzle games especially have the reputation of making the player feel stupid, if your players feel stupid, you probably haven’t properly managed complexity. And hopefully understanding these vectors will give you a better idea of where to start changing things.


3. Avoid Red Herrings

This tip is related to Number 4, but do not include red herrings. What I mean by red herring is that you include an element within a puzzle that confuses the player of the solution. Red herrings massively increase the amount of solution complexity. The reason is that they stop the player from being able to understand what the end state is.  If you include a element, it needs to be clear to the player what function that element is supposed to do. Lets look at some examples from Kana Quest.
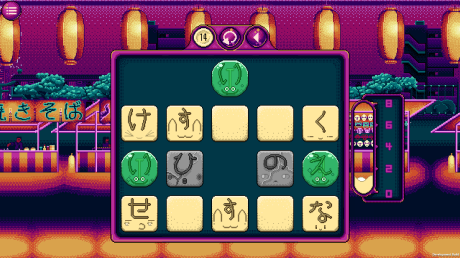
redherring1

First Iteration of World 5 Level 5 in Kana Quest

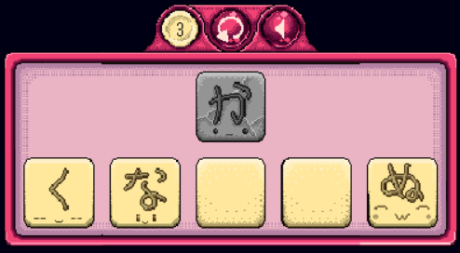
So lets break down whats going on here. In Kana Quest you match sounds between letters, when all the Kana are connected, that’s when the level is complete. In this level there are Slime Kana (The green ones). They cannot match, but they can change the vowel sound of any movable Kana (So not the Stone Kana). So here the player has to use slime kana to make two chains of three Kana that connect to stone Kana. One of the core “questions” of this level is that you have to figure out how to the Slime Kana next to the Stone Kana. Do you use them on the top row, or the bottom row? Pretty simple right? But, in playtesting we found that players correctly used the two い (i) correctly, but used the え (e) wrong and it was causing frustration. The problem was that because the く(ku) was immediately above え (e). For some reason, player’s kept interpreting it as, oh going up is correct because they are next to each other (but somehow ignored the な (na) that was also next to the え (e)) Our solution?

redherring2.png

We just moved the く(ku) over one spot.  It keeps the “question” of the level in tact, but it removed the “red herring”. The red herring in this situation is using the え (e)on the く(ku).

It is incredibly easy to make a red herring by accident, and the only real way to catch them is to playtest and see where players get hung up. And of course, maybe you have a puzzle game that is about getting lost or being obtuse then maybe you can be a bit more forgiving of red herrings. But if you leave them in make sure your players don’t feel like they wasted their time for following a red herring.

2. Try to distil a puzzle into a single element.

I mentioned this briefly when I was talking about red herrings. But you should be able to distil a level down to a singe element or “question”. Lets look at some levels to see what I mean.

GoodLevel1

World 1 Level 3

This is one of first levels that stumps players. This level asks the player “can you correctly order these three Kana, while positioning them in a way that connects to the Stone Kana”.


redherring3.png

World 3 Level 15

This level asks the player “can you figure out the correct order you need to move the three normal Kana on the top into the four One Way Kana on the bottom”.


redherring4.png

World 8 Level 6

The core question of this level is “which one of these three Kana do you slime with う?”

So, the reason I think this is helpful is that it allows you as the designer to hone in to what is important to the level. If you find a level has LOTS of red herrings, properly understanding what you are trying to ask your players in a given level will allow you to get rid of unneeded information, and ask the question you are asking in a more easily understood manner.

Now of course, you don’t need to have only “one” core question in a level. You will often offer the player two core questions, especially as levels get more complex. But when you are introducing new mechanics, or introducing new ways to use old mechanics it is really important to hone in on one very clearly asked question and cut all unneeded information. In other words; only include the information complexity you need, and cut all that you don’t.

One last thing before we move on. When you use this technique to introduce a new element or question I find following a three act structure is helpful.

  1. Introduce the question in its most basic form
  2. Ask the same question in a more complex form
  3. Ask the same question but with a curve-ball this time.

Number 2 is pretty heavily inspired by two episodes of the game maker’s toolkit. Please give them a watch as they explain what I’m talking about VERY well.

1. Give Your Players Small Wins

We are going to finish with something I wish I thought about more at early stages of Kana Quest. And unfortunately for me its a little too late for me to go back and solve this now. But why is this important?

  • It allows you to make more complex levels as the small wins can guide the player to the solution in way that doesn’t feel like giving them the answer.
  • When you make longer levels, it helps your motivate your players.
  • It stops your players getting bored.

Now I did add a mechanic that attempted so solve this problem: Ghost Kana. Lets go over why they work and why they don’t, so you can learn from my failures.
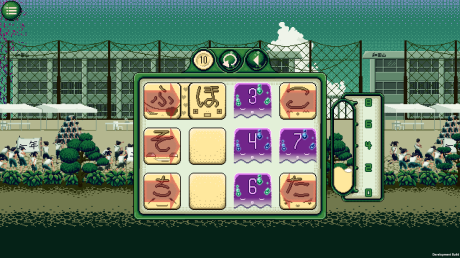
redherring5.png

World 6 Level 10

So Ghost Kana are immovable, and They always have a number on their head. When the player creates a chain of Kana the length of the number on their head they come back from the dead and the player can move them as per normal. Sometimes they come back as blank tiles (if they have green flames) sometimes they come back as actual Kana (blue flames). So the attempt with this mechanic was to allow the players to have some small victories along the way. Like “hey you get a chain of three kana!! Good job, have a cookie” type thing. The problem is that while Ghost Kana do a good job of guiding the player down the correct path they don’t feel like much of an achievement. They don’t make the player go “yes, one down one to go”. Instead they make the player go well crap now I have more Kana to worry about.

A good “small victory” mechanic I think signals to the player that the level has just gotten a little bit easier, and they did good (even if it is an incredibly small victory). And you want to know what game is the undisputed KING of this idea? I already gave you a hint but writing the dev’s name…

Its Candy Crush.

Simply making a move in that game feels like a small win. It makes you want to keep going. But a lot of the more advanced mechanics are just more “small win” mechanics. The locked squares that become unlocked when you match something next to them are great small win mechanics because when you unlock them, it feels like an achievement AND it makes the level just a tinier bit more easy. I know it’s not the answer you wanted to hear, but you can learn SO much from Candy Crush and any aspiring puzzle designer would be a fool to ignore the lessons you can learn from it. Like think about it, the most common criticism levelled at puzzle games as a genre is they make the player feel stupid. Candy Crush is a puzzle game and no one has ever accused it of making you feel dumb, and it a widespread mainstream hit in a genre that often is seen as niche. And I feel like a lot of its success comes from this principle of giving the player lots of small incremental victories on the path to beating a level. I wish I payed more attention to this because while I think Kana Quest is a great puzzle game… if I had learned this lesson it could have been an amazing puzzle game.


Wrapping Up

So that’s the devblog for this month. I hope you liked it and that maybe you learned a thing or two along the way. If you did like this, please consider giving me a like or subscribing to the Kana Quest mailing list at http://www.kanaquestgame.com to get all the Kana Quest devblogs when they come out.

If you think Kana Quest is neat, you can wishlist it now at: https://store.steampowered.com/app/725850/Kana_Quest/

Or you can follow the social medias at

Until next time, take care and have a good one.


Hi all, welcome to the Kana Quest devblog. For those who don’t know Kana Quest is the game I’m making. It’s an educational puzzle game that teaches Japanese. And because to be making a game about learning Japanese, I do need to be reasonably proficient at you know… speaking Japanese.

trailerWIP2

And so a few folks have asked me what my top tips for studying Japanese are (excluding Kana Quest of course). So, today we going to go over my top 5 tips for learning Japanese.

And just a quick run down about my experience with speaking Japanese. I studied Japanese during high school, and did it in my graduating year. From there I studied it at university. And then I went and lived in Japan for a year as an ALT (Assistant Language Teacher). In terms of JLPT, I’ve only done 4 (second lowest). But these days I would put myself somewhere in between JLPT2 and JLPT3. My vocab and Kanji being the things that are probably JLPT 3. But my speaking, listening and grammar are closer to JLPT2. So if you are JLPT2 or higher, maybe take everything I have to say with a grain of salt.

IMG-1340

5. Know Your Resources

The first bit of advice I would give you is to have a good knowledge of the resources available to you. But beyond knowing what resources are out there, when and how to use them. So some resources you will absolutely want to know are…

  • jisho.org – Jisho literally means dictionary in Japanese. It’s probably the best Japanese-English dictionary available to you online. It has lots of alternate translations for most words you search. But it also often has example sentences. Example sentences are so valuable, so pay attention to them whenever you can.
  • Google Translate – This is a little controversial, but if you are using this exclusively to look up one word, usually its pretty good. Not as good as jishi.org, but it is faster. So if you’re trying to remember a word you’ve already learned, or check the kanji for a word you know, its great. Just be aware that google translate can mess up, and can easily lead you astray especially if you are in unfamiliar territory.
  • Kodansha’s Essential Kanji Dictionary – If you are studying Kanji… this is going to be your best friend. I got mine in high school and I love it dearly. This probably isn’t something you want to get if you are a complete beginner. But if you are starting to read more manga or light novels and you don’t know a character and it doesn’t have Furigana, this will save your butt.
  • Dogen’s Patreon Series – This is here for one function and one function alone. If you want to improve your pronunciation, there is no better place to go. I do have some caveats. Dogen emphasises studying exclusively pronunciation above all else. I personally do not recommend this. I personally think you need to study grammar, speech patterns, vocab as well as pronunciation. And becoming aware of the nuances of Japanese pronunciation when you start learning is much better than after you’ve picked up a bunch of bad habits.
  • Textbooks – Personally I only really have experience with the Genki Textbook series. Personally I really liked it, I think it does a good job of explaining Japanese grammar. But I really like studying grammar patterns a lot, so if you don’t… your mileage may vary.
  • Japanese Ammo with Misa – If you hate textbooks, give this youtube channel a go. She covers a lot of the basic grammar very well, as well as vocab. Though she certainly more focused towards beginners than more advanced learners. She also does a good job covering a lot of common beginner mistakes.
  • Nihongo no Mori – Another youtube channel. This one is much better for learners who are comfortable with listening to Japanese with very limited English. They also do excellent grammar, kanji and vocab recap video’s to help you prepare for the JLPT (Japanese Language Proficiency Test). If you are an intermediate or advanced learner, I cannot recommend this one enough.
  • AnkiApp – Sooner or later you’re gonna have to do a flashcard. Anki is probably the best flashcard app. So why not use it? It’s free, its really flexible and it does a good job of tracking your progress. But just be aware that flashcards are only really good at getting a thing in your brain. Not how to use it. Make sure you give yourself the chance to apply the words you use with the flash cards.

jjmbt047-img600x450-1511577783c3hafx19895

4. Avoid “Learning by Anime”

This is not a hard and fast rule, but 95% of the time, when I see/hear someone say I’m going to learn via anime, it usually ends with them either A. not really learning any Japanese, or B. learning to speak “Anime Japanese”. Both are problematic. This is not to say you can’t use anime as a learning tool. But like all tools you have to know how to use it.

If you want to include anime as a part of your study regime, good! Do it. But operative word there is “part”. It can’t be your only method of study. And remember, while it is probably more enjoyable than normal study. It is should still be study.

So lets go over how you actually use anime to study. The first thing you need to do is pick a show. And there is a wrong answer to what show you pick. Do not pick something that doesn’t depict daily life or lots of average conversations. That means you should avoid most shonen anime. The reason is, a lot of shonen anime involves a lot of fight scenes and magical terminology. This results in a lot of characters using language you just will not use in real life. For example in almost any shonen anime, someone will use the word “kisama”. Which kinda means bastard. But you do not use that in real life. Even if you wanted to insult someone, you would not use kisama. You would use “temee”. Which you still wouldn’t use because you don’t want to lose all your friends. You see my point here right. Often times anime uses highly stylised language to add to the drama, this is great for theatrics… but terrible for you learning. So stick to anime that focus’ on daily life interactions. Or better yet, drop the whole anime thing and just watch Terrace House. It’s basically ALL daily life interactions and you get a much better idea of how people ACTUALLY talk in Japan.

So now you’ve found a suitable show, you are going to want to turn off your English subtitles. You heard me. There have been quite a lot of studies based off watching TV and movies if foreign languages, and if you have subtitles in your native language turned on, you’re going to learn basically nothing. Instead, you want to turn on Japanese subtitles. This will give you a visual, as well as audio ques to each word you are listening to. Another reason Terrace House is amazing is that because it’s on Netflix, you can turn on Japanese subtitles REALLY EASILY. Finding Japanese subtitles on CrunchyRoll or Anime Lab is just not going to happen.

Now… Finally you have a show, you have Japanese subtitles turned on. You can finally start watching. Wait did I say watching? I meant studying. You are going to listen to each and every sentence being said, and you are going to stop every time someone says a word or a sentence you don’t understand. You are going to write down each word you don’t know, find out the meaning, re-watch the sentence again and again, until you get what is being said. I also recommend parroting back one characters lines as you do this. Try to copy their inflections and speech patterns as much as possible. This is good for your pronunciation, as well as your ability to understand. Turns out the brain picks up language faster if you speak it out. Keep doing this till the episode ends.  When you start doing this, a 24 minute episode will have taken you about an hour. You will get faster the more you do it, but this is not clean uninterrupted viewing. You’re not going to be able to binge watch a show because you’re concentration is going to be shot by the end of one ep.

And remember, this is not a beginner friendly study method (in my opinion). So if you’re struggling with it, maybe give this another go when you have a bit more practice up your sleeve.

And sides….

World8-9Transition

3. Why Watch Anime, When You Have JPOP?

Seriously though, this is my secret technique for getting better at Japanese. You do everything I just explained for anime, but you do it for a song. And its so much better for a bunch of reasons.

  1. Songs are way shorter and require much less of a time and energy commitment.
  2. You can find kid’s songs that are way more beginner friendly than most anime. And even if you found a kid’s anime that was at a beginner level, you probably wouldn’t enjoy it. But you can find some Japanese kid’s songs that are honestly really listenable.
  3. Music helps you memorise things better, especially if you are an audio learner.
  4. Singing along is lots of fun, and when you go Karaoke, you get to impress people by the fact that you can sing in Japanese.
  5. Because the language in songs is poetic by its very nature, it exposes you to non typical sentence structure. This is good because it allows you to comprehend and parse more complex ideas, and grammar structures when you encounter them outside of the song.
  6. Finding the Japanese lyrics is way easier than finding Japanese subtitles for an anime.
  7. WAAAAAY more choice of stuff you can listen to that will suit your taste. If you watch anime, you are basically forced to watch stuff that focuses on daily life. And if that isn’t your cup of tea that sucks. But with music you can listen to whatever genre you like.
  8. You can listen to music on the way to work/school so you can listen to it and revise things while just listening to music.

The main drawback from listening to music is that you can’t expect to use phrases you learn in song in daily conversation. But I promise you it will help in so many other ways.

But as much I’m raving about using music as a study tool, once again. It is one thing you should do as a part of a good study regimen. And while you can use it to practice many key language skills (Vocab, grammar, pronunciation, listening) and adapt it for whatever you’re weak at. You do still need to spend time speaking, reading and writing in addition.


2. Find a Way to Speak Japanese

I mean, I know this is a bit of a no brainier. But the ability to speak with other people in Japanese will help so much. But finding a place to speak can sometimes be challenging. So here are some ideas of places to look for a conversation group.

  • At a local university. I know my uni has a Japan Club and they do a weekly conversation meet up. From my experience of university clubs, they usually don’t care if you don’t attend the university. They mostly care that you pay a membership fee which is once per semester. While I can’t tell you how much every club would charge, but at mine it was $20 per semester.
  • Try to find people in your area who want to practice. This option I would usually only recommend for folks who are more experienced because non native speakers can’t correct your speaking like a native can. So you will pick up bad habits if you do this too early. But if you’re an intermediate learner this can absolutely be a valuable tool to help you improve.
  • Conversation Classes. This is an option that is only really available if you have the cash to do it, but it is a really good thing to do. Even going once every two months is better than never speaking at all.

712px-Sakura.song


1. Consistency is Key

Yeah, yeah I know this is an obvious one but get over it because you need to hear it again. Doing 5 minutes of study a day is better than 35 minutes of study once a week. Yeah that 35 minute study session would be good too, but consistently getting your brain to process the language you want to learn is the most important thing you can do.

And that word, process is the important thing to remember. Often you hear folks say “Oh you need to immerse yourself in a language to truly learn it”. But honestly immersion is overrated. When I was living in Japan I didn’t have time or the energy to listen in and process everything that was being said around me. So I didn’t improve all that much. Certainly my speaking got better, but my vocabulary and the grammar patterns I knew, stayed mostly the same. Whereas when I was consistently processing new words and grammar patterns and then applying them back in Australia, I improved a lot more. Maybe you’re lucky and you can pick up meanings and grammar from context really well… But that ain’t me.

So for the end of studying consistently, find the study that you enjoy most. If you like reading, buy some Japanese novels on your phone or kindle. And use that as your study tool. I’ve told you the study tool that I like the most: Music. But that’s only the tool I like the most because its the tool I can engage with most consistently.

Maybe the thing that gets you going is performing. If that’s the case, maybe doing speech contests (a lot of Japanese embassies have annual speech contests) could be the thing that motivates you. Maybe you like drawing a bunch. Then you can do calligraphy to learn kanji as a tool to motivate you. Or you could order some Japanese art magazines (and boy howdy do they have some amazing art magazines) and the desire to learn new techniques is what pushes you to translate each page. My point is, find the thing that allows you to practice as often as possible, that you enjoy, and use that to keep you going.

And it is with this principle in mind, that I made Kana Quest (That’s right we are bring it home). I know a lot of folk hate learning the Hiragana and Katakana because the only way to really learn it at the moment is a lot of rote learning. Which is boring and hard to do consistently over a long time. So I figured, what if I made something that people could do consistently until they knew Hiragana and Katakana, and that way they can start doing these other forms of study which while are way more fun and interesting… are also not beginner friendly.

IMG-1257

A drawing of the shrine entrance next door to where I lived in Japan. (Kanji says Yanagihara)

Wrapping Up

Anyway, that’s this month’s devblog. I hope you enjoyed it. If you found these tips helpful, please share the devblog and wishlist Kana Quest on Steam: https://store.steampowered.com/app/725850/Kana_Quest/

Here are all the relevant social media links if you feel like following.

Until next time, hope you have a great month. Happy holidays, and a wonderful new year.

IMG_1835


Welcome back to the Kana Quest devblog! If you’re new here, welcome! I’m Theo, lead dev of Kana Quest. This is where I give you some insight into the process of making Kana Quest and things that I’ve learned along the way.

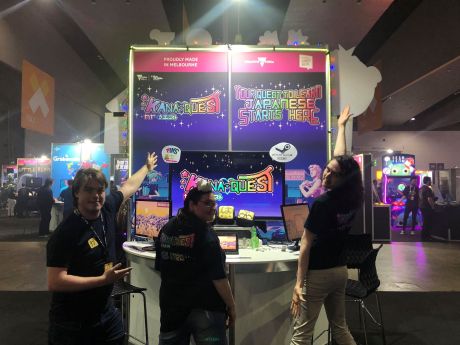
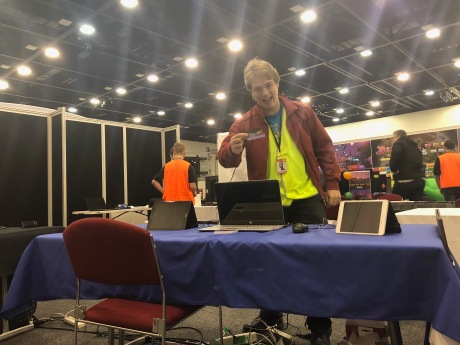
We took last month off due to us exhibiting at PAX Australia, but we are back! And this month we are going to be looking at PAX as the topic for this month. We are going to break it down into two chunks: How PAX went for Kana Quest, and secondly what is the process and logistics of attending PAX like?

IMG_1835.JPG


How Did PAX Aus Go?

Well it started off a two weeks before PAX. Reuben (programmer) and I were trying to get the game running on iPad because we have access to two iPads. But alas no matter how hard we tried, we could not get the damn thing to build. See the problem for us was that we don’t have a mac. And you need one to build to iOS. And unfortunately for us, the mac we borrowed for the explicit purpose of building the iOS build was too old to update to the newest version of XCode. Basically this meant that we had to change plans on what hardware we would be bringing. So instead of two iPads, one Android tablet and a PC, we ended up going with three PCs and an android tablet.

Now we were setting up on the Thursday (night before pax), then Reuben and I get a message on the group discord from Julian one of our composers. He had been boldering and fractured his ankle. He was going to be coming down to help us exhibit, but alas that was no longer happening. So we had to frantically search for people to cover his shifts. Luckily I have good friends who rose to the occasion and I was able to cover the shifts pretty easily.

IMG_1903

Once the actual convention started things went pretty well, people seemed to really like the game. We had lots of compliments on the art, and the actual gameplay. We had one nine year old girl play the game and she declared it “the best game ever” so I’ll count that as a win. I also had quite a few Japanese speakers enjoy the game too. I always love it when Japanese speakers enjoy the game because it means that the game part of Kana Quest stands on its own without needing any of the educational elements.

Another thing we did just before PAX was we finally got the Steam store for Kana Quest up. Valve has started putting games that are showing at big conventions at the front of the Steam store page, and we got a pretty good amount of wishlists over the course of the weekend. Speaking of which….. (shameless plug incoming)

https://store.steampowered.com/app/725850/Kana_Quest/

You can now wishlist Kana Quest on Steam. Please do if you like the look of it! (Ok shameless plug over)

And of course by the end of the weekend we were all completely dead on our feet and were very glad to go home and get some rest.

IMG_1844.jpg

All of us getting desert on Sunday. Completely and utterly dead on our feet

What are the logistics of attending PAX Aus?

So, now we are going to get into the nitty gritty of what exhibiting involves and what you should you expect should you go.

The first thing you should know is it isn’t cheap. If you live in Australia and you haven’t done a convention before, I would not recommend PAX. I would recommend doing ACCon in Adelaide to get an idea of what you are in for first, but also to get feedback from people. If you have the following things, then PAX Aus is probably worth your time.

  • Have $2000+ that you can spend on publicity.
  • Have done a convention before.
  • Have a team of at least 5-6 people who can help you exhibit.
  • Your game looks polished, presentable and is mostly stable.

If you tick these boxes, then what you want to do is apply for the PAX Aus Indie Rising section once applications are opened. You will be asked to supply a build, a short video demonstrating gameplay, a summary of your game, and some screenshots. You will then, be likely receive a call or email from someone at ReedPop the organisers of PAX Australia. They will ask you some questions about your game like “is there nudity or high levels of violence in your game?”. If its a no on both counts, they should offer you a spot. You will then receive an invoice and you are on your way to PAX! Of course this is all under the assumption you get in before all the booths are sold. I did not get to exhibit in 2018 because I was too slow on applying.

Costs (everything here is in AUD)

Now let’s get into cost of things. The cost of your indie pod booth is about 1700$. This comes with two chairs, two exhibitor passes, booth art, and that is it.  You need to bring your own screens, decorations, and furniture. I would also recommend getting at least one additional exhibitor pass ($125) just to allow the logistics of having people be on shift (we will get to the running of the booth later). Personally I don’t think you need to get additional furniture, unless you have a premium booth. So the cost of additional passes and the booth will come to a little under two grand. Not exactly pocket change.

But another thing you need to remember is that you will be spending money on food over the course of the weekend. And you will need to spend money on booth essentials (which I’ll talk about later). From experience this adds another $100-$300 depending on your needs.

So how can you, make these costs less painful?

Now if you are based in Victoria, Creative Victoria does offer a grant for $750 to help you show your game at PAX. If you live in Victoria, please apply for this. Having the cost of attending reduced by a third is such a big deal.

If you you don’t live in Victoria, the best thing you can do to reduce the cost of PAX is our next topic: Merch

IMG_1833.JPG

Merchandise

Merch is probably going to be how you actually pay for your booth. In fact if you have good enough merch, you can end up making money at PAX. I heard on the grapevine that multiple games sold out of their merch, which resulted in PAX paying for its self. This is your goal with merch. Here are some good ideas for different types of merch.

  • Clothing
  • Pins (high quality enamel)
  • Plush toys

Types of merch you don’t want to do.

  • Stickers
  • Stationary
  • nick-knacks

The reason you don’t want to do stickers is that if someone uses your sticker somewhere in the convention hall, if it is easily traced back to you, the convention hall will fine you for it.  It is not worth losing money over. And you don’t want to do anything too small like stationary or nick-knacks because they are easily lost, but also because of the numbers. You are only going to get so many people who love your game enough to buy merch (unless your merch is good enough on its own), you would rather those people buy something big and substantive that way you recoup your costs faster. Also, it means you can justify making the product of a higher quality. You want to be selling good quality things because you don’t want your potential fans thinking you sold them crap.

For this reason, really cool well made clothing works really well. Samurai Punk consistently has lots of people come and buy their shirts just because their designs are so cool. But you do need to make sure the design is good enough on its own. I did t-shirts in 2017, and they were a complete bust because the design wasn’t high enough quality.

Plush toys are really popular if you are able to get them made, but finding a place to get them made can be tricky. But because so few other games offer them, they stand out more. But if you don’t have any designs that would make a good plush don’t worry about it. We sold Kana Quest plushies in 2017, and they sold extremely well. My only regret is that we didn’t make enough. We sold out on the first day when we were selling them for $15. My sister made all the plushies by hand, so she very graciously made some more over night. Will raised the price to $25 for the rest of the weekend. The price hike slowed sales quite a bit. If we had made more to begin with we would have been able to justify selling them at the lower price throughout the weekend and we would have made way more money. I used a company called Neon Republic for my pins and they had a two month wait between ordering and delivery, so do take those times into consideration when considering pins.

Finally we have pins. I have never done official Pinny Arcade Pins, but from my understanding, if you do, you are gonna make bank. Now you don’t need to go through Penny Arcade to sell pins, but they wont be Pinny Arcade, so you will have to price much lower than the official pins. You also wont attract Pinny Arcade collectors, so you wont sell as many either. But I sold pins this year and we did really well for ourselves. It cost me $350 to have them made. I had two designs, of which I had 50 pins each. One design almost completely sold out, and the other sold about 30. I sold mine for $10 for the simple design, and $15 for the complex design (the cost of pins goes up, the more colours you add). At the end of the event I had made about $700 on the pins. Now one bit of advice I would give is try to use in game art over a logo for your pins. I had one pin of one of the Kana tiles, and one of the Kana Quest logo. Although the logo turned out much nicer, most people wanted the Kana tile because it didn’t specifically look like merch. It was just a cute generic looking pin that folks could put on without them looking like a brand shill.

The final thing to know about merch is that in Australia, you wont make money if you can’t take card. For international readers, a lot of Australia is cashless and a large number of convention goers will not have cash on them. Make sure you have a square space reader or something like that on you in addition to a well stocked lock box. And one small thing on this note, have a sign that says you take card. I forgot and I’m sure I lost sales because folks didn’t know I took card.


Booth Essentials

So what are some other things that you’re booth is going to need.

  • Strepsils
  • Gaffa Tape
  • Double sided tape
  • Scissors
  • Cardboard (whatever colour will work with your booth), you will use this to make signs for…
    • Availability on certain platforms, eg steam
    • What merch you have available
    • signs for selling the flavor of your booth
    • any special deals your are offering for your game
  • A pallet of bottled water.
  • Antiseptic Gel
  • Snacks
  • Aspirin
  • A sharpie
  • Any other decorations you think you will need.
  • A card reader
  • Cashbox
  • A keep cup (Epic games has comped the indie section with free barista coffee the last few years. Bring a keep cup so you can make the most use out of Epic’s generosity)
  • Back up controllers/Mouse
  • Business cards (about 400-600 of them from my experience, but if you have a more popular game than mine you might need more)
    • Website
    • Email
    • relevant platform store links (eg. steam store link)
    • Social media accounts


Bump In, and Bump Out.

So you will be allowed onto the show floor on Thursday. If you don’t have a high viability vest, you will need to buy one from the PAX people directly. Once you have one, you can enter. Your booth should have a key on the bench, this is what locks and unlocks the cabinet space under your booth. Do no lose it. I recommend getting in nice and early to set up. This means you have the most amount of time to change your mind about presentation, but it also means there probably wont be a long wait for the tag and test. Tag and test can often lead to looong wait times if you go in at the end of the day. I do not recommend.

On the topic of the tag and test. Every piece of electronic equipment that plugs into the power source has to be tagged and tested. If a cable is slightly damaged, it will not pass. They will not allow you to use it. Do not be caught out thinking you can use your laptop, only to find you can’t because a little bit of wiring is poking out. If you have a mouse, or a controller that plugs into a usb slot in your computer, you do not need that to be tagged and tested.

Once the tag and test is done, you can plug everything in. Test that your game build works on all the hardware. Ideally you will have done this a week beforehand but I have seen folks not test things and find they have to fix things when the show opens to the public.

That’s most of the information for bump in and bump out. Do it early, and don’t forget your high vis vest.

72698000_432062614108478_4403278983861370880_n

Manning The Booth

So at the start of this section I said that you need about 5-6 people to help you. This is because you need to give people breaks. Pax is a loud environment in which you will be doing a lot of talking, standing and trying to create an inviting environment for your booth. For this year we had 4 people at the convention centre at all times, two people would man the booth at once, the other two would be on break. The exception being if it gets really really busy, or someone at the booth needs something (eg food). We also worked in 1 and a half hour shifts, changing one person every 45 minutes. I also gave everyone but myself a day in which they did not have to man the booth at all. This is good because it meant that folks got a chance to see the show, but also relax without having to worry about any of that booth stuff.

While you are manning the booth, feel free to ask people if they would like a go. But do read their body language. If they are closed off, don’t bother them. If they look interested go for it. For example I would often say “would you like to learn some Japanese?”. This is a nice easy yes or no question. If they say yes, invite them to play. If they say no, wish them a good day. Don’t push them to play your game. Lots of folks just walk through the indie section, find the games with art they like the look of and save them. They wont stop and play, even for a game they think they’ll love. Do not pressure those folks to play, as you will sour the game to those people by you not respecting their boundaries.

I also find its good to have a handful of business cards on you. People often pass through and will just ask you for a card. I do find a card is better than a pamphlet, as cards slip easily into pockets whereas a pamphlet is has to be put into a show-bag or get scrunched up.

IMG_1839

What to Expect Day to Day

Friday is your quietest day. Because of this the press are most likely to play your game on this day. The press also get let in an hour before the general public. This is why you really should have your booth set up on Thursday. If you are still setting up on Friday, press will pass you by. If a member of the press plays your game they will often come back for a proper interview later. Another thing to remember about Friday is, if there is anything you really want to do on the show floor, today is the day to do it. Do not wait till the weekend. You will have no hope.

Saturday: pray to whatever deity your worship, and hope you receive mercy. I’m being dramatic, but this is going to the busiest day. There are going to be SO many people. Stay hydrated. Take your breaks. And pace yourself.

Sunday is busier than Friday, but its not as out of control as Saturday. Often press will come back to you to record interviews on this day. Things will also close a bit sooner so you can bump out. The last thing is, on Sunday evening there is Megadev. It is the game developer mega party at the end of Melbourne International Games Week. If you want to go, ask around the other game devs in the indie section to see if they are going. If they are, ask them for the code. They will only give it to you if you are a game dev. Once you have it you can purchase at ticket on the Megadev trybooking page. It does cost a bit of money though, and I think you only get 1 drink token from memory. I personally don’t enjoy it as by this point in time, I am done with loud, crowded spaces from PAX. But if you want to get sloshed with a bunch of game devs, this is where you want to do it.

Monday: TAKE THE DAY OFF. Take the week off. I’m not kidding, taking the week off is a good idea. You will be absolutely wrecked afterwards. Now is the time for self care. You will also probably get sick here, so have fun with that.

Wrapping Up

That’s basically all the information I’ve learned over the course of doing this thing two times now. I hope this was informative. If you have exhibited at PAX Aus, feel free to drop your handy hints in the comments.

And if you like the look of Kana Quest, or you felt this blog was useful to you please consider …

Wishlisting the game on Steam: https://store.steampowered.com/app/725850/Kana_Quest/

Following the Official Kana Quest Twitter: https://twitter.com/KanaQuest

Or liking Kana Quest on Facebook: https://www.facebook.com/KanaQuest/

Good morning all, welcome to another edition of the Kana Quest devblog. Now last time I said we would have a blog written by the composers to talk about their process. As they are still working hard on making all the music right now we are going to postpone that one for an upcoming month. But is still happening.

And one more bit of news… Kana Quest will be coming to PAX Aus this year!!! So if you’ve been wanting to give the game a go, come on down, say hi, play the game, and find a handful of bugs as I freak out that there are still bugs in this thing. It shall be a swell time.

Now, onto this month’s topic…

Top 5 Dumbest Things That Theo Coded/Implemented Into Kana Quest.

So I was talking to my programmer Reuben this week and we got chatting about some of the frankly stupid things I’ve programmed since I started Kana Quest. And to be honest, most of these things are funny. So for the sake of entertainment, I am going to curate the finest pieces of coding idiocy my brain has produced. And hopefully this will explain to my relatives what I mean when I say that Game Designer is not a Programmer.

5. Stupid As Hell Names

So this one is relatively harmless on the “Theo, oh god what were you thinking” scale. It just meant that every now and again I would get a bewildered Reuben going “Theooooo, what does _______ do”. So lets look at some of the stupidest names for variables or function names that exist in Kana Quest shall we?

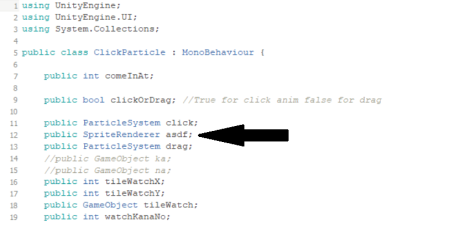
DumbCodingPart1

Because nothing says “Always give your variables descriptive names” like asdf.

I mean who hasn’t had been in a situation where they are too lazy to come up with a proper name for something. And this function is a pretty minor one so who cares riiight?

DumbCodingPart2

I mean at least this time the silly name explains what the script does… it moves shit… and it checks if shit has been moved. Simple. I can’t see any problems with the documentation here what so ever. Except for… you know… what is the actual shit is this script is moving.

DumbCodingPart3

This script is a completely different script from the last one

In a similar vein… “heyLookAtThisShitImHolding4U” is just flawlessly named. It perfectly sums up what the script does. It sits there holding level button data and doesn’t do anything else whatsoever. 10/10 flawless coding.

DumbCodingPart4

Unlike the previous scripts, if you got rid of this one you would get horrible visual glitches. Lot of pressure to place on monkeys, but they do the job.

Fun fact, if you have infinite monkeys sitting at infinite computers running Unity, they will eventually end up with an exact copy of Kana Quest. Really puts my coding ability into perspective.

DumbCodingPart5

And now we reach the pinnacle of both comedy and stupid names… Star Wars puns. 

The name here isn’t the funniest thing. Its the conversation with myself that happened afterwards in the comments. I forgot multiple times that I had written this stuff and each time I’d add another comment. I can’t really add any more on because I remember that I wrote all of this now, but its a fun little bit of stupidity. And it makes a good closing point on the category of dumb names.

4. The Hierarchy of the Parallax Objects.

So for those of you who have never used Unity or Unreal Engine. Every level (the technical name is a scene in Unity) has a hierarchy of all the objects within it. A normal person’s hierarchy might look something like this.DumbCodingPart6

See that window to the left? That’s this level’s hierarchy. Each object on that list is an object in the level. And if there is an arrow next to the object it means there are objects attached to it (the technical term is the object has children). This is what you are supposed to do. This way you don’t have to scroll down a massive list every time you want to change something. So you would think, that because I did it correctly here, in one of the levels, I would have done it consistently correctly across the whole game…

Ha no.

See in the level select screen, the background parallaxes. What that means is that the 2D images in the foreground move faster than the background images. This creates the illusion of depth. And it allows me to make pretty gifs like this.

World8-9Transition

So what does this have to do with the hierarchy? Well because of the silly way that I coded the parallax system. It can’t handle having objects having children like shown above. So now the level select scene’s hierarchy looks like this.DumbCodingPart7.gif

The eagle eyed amongst you can notice that there are some objects that do have children in this hierarchy. That’s because some objects are ok for me to give children, while there are others that is isn’t ok. The line is if I don’t want to be able to move the child objects with the parallaxer. Doesn’t excuse the stupidity of doing it this way but at least I get to turn it into that sweet #content.

3. The Way Movement of Kana Coded.

Hey Kids! Do you like repeating the same bit of very long complex code 4 times with with very small and minor variations that are very easy to miss? Then you would have LOVED the way I had originally coded Kana Movement. Unfortunately (fortunately) I can’t show you what this one looks like as Reuben mercifully has fixed it to function in a much better way.

See the problem was when I first coded the movement I didn’t know about all your highfalutin coding terms like *structs* and *enums*. So the way I tracked the direction the player was moving was with an integer value. And it would run four different versions of *THE SAME CODE* four different times just gated off with if statements to get the effect that I wanted. It worked, and according to Reuben my logic within that chunk of code wasn’t even that bad. But it did mean that it would take me 4 times as long to add in a new mechanic or edit the movement code as I had to repeat all the changes I made to one part of it an additional three times. One of the first things Reuben did when he got the job of programming was changing this.

DumbCodingPart8

What I should have done in the beginning

When Reuben finished cleaning this up, he was able to delete a whole 2000 lines of code. And adding in new mechanics became infinitely easier as a result. Good times.

*somewhere Reuben’s eye starts twitching*

2. All The undo Function Information.

On a running theme of not knowing how structs work when I made it the undo function. See there is only one thing more complicated that moving Kana in this game: Undoing Kana. See the problem is that when I first made the undo function I decided that rather than swapping the game objects back to their original positions I decided that I would just swap all the data held on the objects that got moved.

This was fine when there were no strange and unusual mechanics. But the moment I started adding new mechanics I had to start adding new variables to track if one of the objects was one of these new mechanics. This would have been ok… if I tied all those variables together under one struct, it would have been fine. Also for those who don’t know what a struct is. Basically you get to determine the boundaries of a new variable type. And because of this you can make an array or list of that new variable type. This is important is it would allow me when making the undo function to ensure that the many different undo variables don’t get out of position. But that’s not what I did. So instead we have a tangled mess of a metric fucktonne of different list variables that we just have to hope and prey don’t get out of position and work as they are supposed to. Reuben took one look at this script and just said “nope” and decided he wouldn’t refactor the system.

DumbCodingPart10

You can see Reuben’s opinion of this system in the comments up the top

DumbCodingPart9

And these are all the other variables being used to manage the undo function. 

And you might have noticed if you were paying attention, that there is a variable in there called “movementType”, with the comment “//0 is up, 1 is down, 2 is left, 3 is right”. That does mean exactly what you think it means. The issue that I told you about as the number 3 dumbest thing that I coded into Kana Quest… it is present in the undo function. And because the undo function is such a mess, it never got cleaned up.

DumbCodingPart11.gif

Everything is fine. Say it with me now, EVERYTHING IS FINE


1. The Animation System

And here we have, the biggest, baddest most horrible monstrosity my sick, twisted mind thought was a good idea at one point. The animation system. “Why is the animation system such a problem? Surely your game doesn’t use that many animations” I hear you ask. Well think again because if I have an opportunity to make something bloody hard for myself I am going to take that opportunity.

And it alllll comes back to the fact that I decided I wanted the Kana in Kana Quest to look like this.


See how cute the Kana are? What could possibly go wrong? Well it all comes down to the numbers of it all. See this game teaches you how to read Hiragana and Katakana right? Well there are 45 base Hiragana, and 45 base Katakana. So that means that I will need 90 animations to cover each Kana. And as long as I just load up the correct animator object that has the correct animation attached this will be fine. Riiiight?

Wrong, because I decided in all my infinite wisdom to attach EVERY SINGLE ANIMATION to the one animator object. But then I hear you ask, but it’s only 90 animations, surely that’s not too bad right?

WRONG

Before I said there are 45 base Hiragana and 45 base Katakana. There are ways to alter the sounds of Kana. For example き(ki)+や(ya)=きゃ(kya). There are an additional 21 animations for both Hiragana and Katakana for all the ways you can modify a Kana’s sound. So there are 132 animations.

But like a bad infomercial…

BUT

WAIT

THERE’S

MORE!!!

Because this is just for the normal Kana. There are Stone Kana, Ice Kana, and Ghost Kana that all have their own unique animations. There are an additional 132 animations for both Stone and Ice Kana. Which brings us up to 396 animations. There are 20 animations for all the Ghost Kana, so that brings us up to 416 animations, all attached to the one animator. There are a couple of other unique one off animations that I am excluding here for the sake of brevity, but suffice to say there are a lot of the fucking things. The end result is an animator window that looks like this.

DumbCodingPart12.gif

But, the best thing about all of this is that the version of Unity I am using is 3.1.6f. Which is long before they added a zoom function to the animator window. Which means I’m stuck panning manually like this if I need to edit, ANYTHING. And of course it also means that I can’t mass edit the transition logic. So Reuben and I have had to edit, EACH, AND, EVERY, ONE, by hand. Which leaves a lot of room for human error. Together we have probably spend a full working week of time, just editing and navigating around this thing.

Ah, fun times.

Wrapping Up

I hope this has been a fun look at my own stupidity and inexperience. We will be back next month for another Kana Quest devblog. Hopefully it will be with our composers but I’m sure I will be able to find something to talk about if they can’t do it next month either. Here are the relevant social medias for Kana Quest

And until next time, have a great month!

Hi all,

It’s the second Saturday of the month which means its time for a now Kana Quest Devblog! Last time I said we were going to unpack several choice levels from the game, and what makes them good levels. And that’s exactly what we are gonna do. So

Now if you’re new here, Kana Quest is a cross between dominoes and a match-3 game that teaches you to read Japanese. You match sounds between letters, and when all letters are connected the level is complete.

GoodLevel1.png

This is the fourth level in Kana Quest and is the first level that consistently stumps players. Up to this point levels have been made to get the player used to moving Kana around, and understanding that stone Kana can’t move. This is the first level that actually tests the player’s understanding of how Kana match. So, how is this achieved? It is achieved by asking the player two simple questions; “In what order do the three movable letters need to be in so they all match?” and “Now that I have the order of the three movable Kana, how do I position them so that the one stone Kana also matches?”. These might seem like very simple questions, but there are a few factors that make them a lot harder than you might suspect. The first thing is that, this is the first time the player has had to order 3 Kana. Second is that all of the Kana have been deliberately placed so that the player has no matches, this means they are effectively starting from scratch. Thirdly the number of potential configurations is way higher than all levels up to this point. Finally, because the stone Kana is placed in the centre of the board, it means there are a total of 4 different correct solutions. But it doesn’t guide the player to any of those solutions in of its self. This forces the player to pay attention to the sounds of each Kana, and use that information to solve the level. Not use the shape of the level to tell them the solution. This is not to say that using the shape of the level to guide the player is a bad thing. It usually is a great thing to do, especially for more complex levels. But the purpose of this level is to test the player’s understanding of how Kana match.


GoodLevel2

The next level I want to look at is the final level of world 3. So where the previous level was testing the players understanding of how kana match, this level is testing the players understanding of one directional kana. One directional kana, are a lot of fun to play with because of how the restrict the number of potential arrangements of the kana. This is useful because it can be used to signal to the player the shape of the solution.

This level is set up so that there are only 5 possible positions for each row that could be the correct position. This helps the player start with a very strong sense of how to solve the level. But there are two curve balls in this level. The first is the one normal Kana (の) at the top of the level. Because this kana could potentially go anywhere in the level, the player has figure out how to best utilise it. The second is the one directional す on the right of the level. This says to the player that one of the three rows to the left of it need to be all the way over to the right, but you need to figure out which it is. When these two elements are mixed with each other they create an ideal puzzle. A puzzle where the player has a strong idea of their goal, but they still have to work for it. One last small detail from this level that I like is the blank one directional kana. These serve to prevent the player from trying red herring solutions. Red herring solutions are fine to have, but each red herring still needs to lead the player towards the solution. If a red herring just leads the player down the wrong path and leaves them at a dead end, you need to get rid of it, as it will only aggravate your player.


GoodLevel3.png

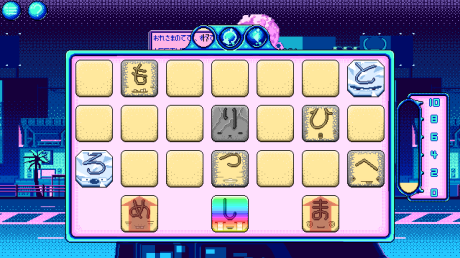
So for the last level that I want to talk about today is from the ninth world. If the first is an example of a good introductory level, and the second was a good intermediate level. This is a good hard level. So what makes this a good hard level? Well, honestly the same thing that’s made the previous two good; You know what your goal is, but you don’t know how to get there. This level achieves this with the り in the centre of the level. Because it is central, and it cannot move because it is a stone kana, the first thing the player will do is look for the other kana that match with it. In this level there is the transform kana (the rainbow coloured one), the ice ろ, and the paralysis ひ. The paralysis ひ has to end up to the right of the り because it can only be moved once before turning to stone. This leaves three spots left for the ice ろ. This puts the player on a strong starting direction for the level. But the thing that makes this level so challenging is that because of how ice, paralysis and one direction kana work, if the player makes moves carelessly they will trap themselves and be unable to complete the level. Once again, the needed end state is easy to determine, but how to get there is the challenge. The only real difference between these three levels is that they make the “how to get there” part more complicated.

Anyway, that’s the Devblog for this month. Hope you enjoyed. I’ll be back next month on the second Saturday of the month. I haven’t figured out what the topic is gonna be, but ill figure something out. Until then, take care!

Hi all, its another month and that means its time for another Kana Quest DevBlog!!

Like last month I have just been working on levels. But the big difference between this month and last month is that I am now SO CLOSE to finishing all the levels in the game! There are 13 worlds in a Kana Quest, I have finished making levels for 11/13, and the 12th world is more than two thirds complete. So we are in the home stretch here folks.

At this point I have had a chance to work with all the mechanics in the game and I thought it would be fun to talk about each in depth about the positive and negative elements of each.

mystery

And oh how the mighty have fallen. This is a Mystery Kana, and they were the first mechanic I made for Kana Quest, and I was so proud of it at the time. And I still think its a valuable thing to have in the game, but the more I used it the more utterly irritated I got when I play-tested any level with them in it. So why did I make them? Why are they important? And why are they so irritating? So I made Mystery Kana because I was having a very specific problem, players weren’t flipping over the Kana to learn the pronunciation to complete the levels in the first world. This is problematic because it would render the entire function of Kana Quest meaningless. So I needed a way to effectively force the player to look at them. Mystery Kana do that very well. They just also irritate the player at the same time. The way these things work is they cannot move, but can match. The player needs to keep track of what each Mystery Kana, does and does not match with. Then using that information, figuring out what the Kana’s true identity is. The biggest problem with Mystery Kana is they just simply break the flow of the game and force you make non optimal moves to figure them out, and then you can complete the level. The end result is they start to become a nuisance after a while, and its for this reason they get phased out after world 4.

OneD

The One Directional Kana have been a solid work horse throughout development. There are so many things about this mechanic that are excellent from a designer’s perspective. 1st is they are easy to understand from a player’s perspective. The arrow shows you what they do; they only move in one direction. 2nd is they have a huge amount of design space. Design Space is a design term for talking about how many different interesting configurations a mechanic can be used in. And these Kana allow for so many interesting levels to be made. I am still finding new and interesting ways to use these things even in the 12th world. They are also very flexible in how they can be used. If you want to build an entire level around them, you can and it will probably be a really fun level. But you can also just throw one of these into a level to help guide the player towards the solution. I suspect once I have finished making levels, and I’m in the polishing stage I will end up adding a lot of One Directional Kana for this exact reason. What’s more is they also have interesting interactions with basically every other mechanic. The only complaint I have against them is they can be very punishing of mistakes. The reason for this is if you move one spot too far and then make a bunch of other moves, you end up spamming the undo button more than is ideal.

IceDemo

The fourth world’s mechanic is the Ice Kana. These Kana will keep sliding in the direction you move them until they make an invalid move. These Kana are a good mechanic, but no where near as easy to work with as the One Directional Kana. They have a large amount of design space, they have interesting interactions with most other mechanics, and they can make some very fun levels. But the problem is that you can’t just through one of these into a level. Even if the Ice Kana is supposed to be a minor element to a level, you have to build the entire level around the Ice Kana to accommodate it.  This is not a bad thing as it allows you to create a nice change of pace for the player at points, its just something that needs to be treated with care. Another small problem is they tend to demand levels be a fair bit larger than a similar level without them would be. Other than that, I think Ice Kana are great.

SlimeKana

The Slime Kana are another mechanic in a similar vein of the Mystery Kana as they both play around the sound matching aspect of the game. And so what they do is they will change the vowel sound of any kana you use them with. However unlike the Mystery Kana, these do not get highly irritating after a while. The main reason for this is that they often feel like they are helping you, rather than getting in your way. And because of this is they can just be plugged into a bunch of levels to add a little bit extra. But the biggest weakness of them is that they struggle being the core element of a level. Where the Ice Kana can’t help but be a diva, the Slime Kana struggle with it. Another problem with the Slime Kana is that because the Kana that appear on them can only be Slime Kana it does mean that the Kana on them just get seen less than every other Kana. But the gameplay of them is still solid enough that I made two variants of them.


GhostKana

This is a Ghost Kana. Ghost Kana, cannot move and cannot match. But they will come back from the dead once the player has made a group of Kana equal or greater than the number on their head. This is a tricky mechanic. And honestly they represent the biggest disparity between what its like to work with them, compared to what its like to play with them. Because playing with them is honestly pretty good. They make interesting scenarios, and force you to think about the level in a different way. But from a designer’s perspective these things are so hard to work with. You have to engineer levels so carefully around these to make them fun for the player. They have very limited amounts of design space too, so I honestly struggled to finish the world where these were introduced. And what’s worse there are some mechanics that this straight up does not work with.

YaSlimeKana

So this is the first of two Slime Kana variants. This is a Blue Slime Kana. Blue Slime Kana are different because they only ever attach to Kana that end with an “i” sound… and they add an additional vowel to match with rather than completely changing the vowel. This is because of an actual function in Japanese. See Blue Slimes can only have the following letters や/ゆ/よ. And these letters can attach to other letters to make slurred sounds. For example き(ki)+や(ya) = きゃ(kya). So きゃ will match with “i” ending kana, “a” ending kana and “k” starting kana. This makes the mechanic quite satisfying for the player to use because it opens more doors for them than regular Slime Kana do. And its for this reason that they can be a bit frustrating to design around as a game designer. Another problem with them is they have to attach to a kana that ends with an “i”. This over the course of the game makes “i” ending kana being over represented in comparison to other kana. Whats more is that often you have to design levels in which fully utilise the multiple vowel sounds. But this often leads to further exacerbating the over represented “i” problem. But other than these issues, these kana have all the strengths of regular slime kana. And they allow me to illustrate an important part of reading Japanese.

Paralysis These are the Paralysis Kana. They can be moved once… but after that they turn to stone and cannot be moved. These are probably my second most useful mechanic, just after One Directional Kana. They allow for interesting level design, and they have a good amount of design space to them. Not quite as much as One Directional Kana, but still a large amount. They are also very easy to understand what they do. And they can be the focus of a level, or be used as a back up element. The biggest problem that they have though is they have a hard cap on how difficult they can make a level. This isn’t a bad thing as it does mean it’s basically impossible to make a level that is too difficult with these but it does make them a bit more restrictive as one might like in later levels.

Transform

Transform Kana are pretty straight forward. Then can become any Kana, but they can only be one Kana at a time. This mechanic probably has the least frills of any of my mechanics, and you what that’s ok. It works just fine. They ask a simple question of the player, and that question is “where am I needed, and what do I need to be?”. So the trick to designing around these Kana is making sure there is a spot that can only be connected with a Transform Kana. Which is fine as long as one is careful with the other Kana that are used within the level. If you aren’t careful the player will just plop the transform kana anywhere and not have to think at all. They also suffer the same problem that Slime Kana face in that they struggle to be the focus of a level, but they do slot into lots of levels pretty easily.

MaruKana

Here is the final Slime Kana variant. And this is yet another instance of me basing a mechanic off an actual function in Japanese. There are small added strokes called “tenten” and “maru” for Hirgana and Katakana. These will change the consonant of the letter they are attached to. In the game this often is something that is a disadvantage, not an advantage like the other two Slime Kana. Because of this you cannot finish a level if there are any Purple Slime Kana left in play. This forces the player to find the part of the level that can accommodate losing its consonant sound. Basically everything that applies to the first two applies to this one.
  DickheadKana

This is an “n”. Because they don’t share a consonant or a vowel with any other Kana they cannot match like a normal Kana. So I decided to make them the Unfriendly Kana that all other Kana hate. So for as long as an “n” is in the level, you cannot complete it. So how do you get rid of an “n”? You dump them into a rubbish bin. Which looks like this.

Bin

Once an “n” is moved into a rubbish bin both are removed from play, and the spots they occupied become empty spaces on the board. This mechanic requires a fair bit of set up to get working, but once you set up a level to accommodate them its a solid mechanic that has a solid amount of design space. One unique problem with this mechanic is using effectively uses up twice the amount of space that a regular Kana would. Because of this levels with this mechanic tend to look very cluttered and can be a bit difficult to process. Outside these problems they are a solid mechanic that just needs a bit of preparation to make work.


Finally we have Kana Sliders. The art for these is still under way, but what these do is they move every Kana in a row or column down one spot as long as there is an empty spot on the board in that direction. This is a very easy mechanic to design around and offers a lot of design space that had not been available for me for most of the game. Because Kana Sliders care about empty space, it allows them to interact with Slime Kana and Unfriendly Kana that no other mechanic has been able to do so far. The biggest problem with them however is they tend to make levels with ridiculous amount of moves required to complete them. There are levels that require more than 70 moves to complete with this mechanic. This can be problematic especially if the player makes a mistake early on as they will be punished especially hard for that error. Other than that issue, I love working with Kana Sliders.

And with that this weeks Kana Quest Devblog comes to a close. Next time I think I’ll pick out a handful of choice levels, analyse them, talk about how I made them, and talk about why I think they are special.

First thing’s first, I know I missed the January devblog. I’m sorry it wont happen again. But… it’s here now, and it’s a new year, which means this is the first devblog for 2019! This is going to be a big year for Kana Quest as this is the year we are going to release! Knowing the end is in sight is a strange feeling as I’ve been working on Kana Quest for the last two years of my life. But I hope you all will be there with me as we run headlong down this final stretch!

So what does this “final stretch” look like in terms of development? Well for me personally that means making all the levels. I had spent most of 2018 finishing the art and making all the visual assets, but in terms of gameplay, very little was being made. But now that I’ve finished all the visual assets and Reuben my programmer has finished programming in each mechanic, I am able to churn out levels very quickly. How quickly is that? Well since last month’s devblog, world 5, 6, and 7 now have all their levels made. Of course these levels still need play testing before they are 100% good to go, but they are playable, and reasonably balanced.

So, seeing as levels are all I have been doing this past month, I’m gonna tell you how I have been making them. And some of the weird things I have to pay attention to when I’m making levels.

The first thing I do when I start making a level is I figure out, how hard I want this level to be, and what kana I want the player to see.

flowchannel

Sorry if this is a bit too game design 101 here buuut… This is the flow channel. Flow is that feeling where you are in the zone. But getting the player into the zone requires very careful balance from the game designer. So something I’m sure you will notice when you play Kana Quest is that every three to five levels will build in difficulty, only to drop back a bit and then continue ramping up in difficulty.  The reason you do this, is that it’s just more fun for the player.

In Kana Quest there are a few different ways you can control the difficulty of any given level. They are:

  • The amount of Kana in a level
  • Size of the level.
  • Potential board state permutations
  • Number of potential solutions
  • Complexity of solution.

So lets go through each of them. And first up is the amount of Kana. So in my experience, you have a hard cap of about 14 -16 different Kana in a level. Why is this? This is because past this number, there is too much information for the player to comprehend. And personally, even I can’t process levels with this many Kana. It’s also a difficulty that isn’t a lot of fun for the player. Solving the puzzles is fun, recognising kana… not so much.

The size of the level like the amount of kana, also has a hard cap. This time its not so much about overwhelming the player though. The largest you can make a level in Kana Quest is 7×4. This is simply because if you make the level any bigger, it will not fit on the screen. I know that sounds silly, but due to the way pixel art works, there is no easy way to just “zoom out” without also causing a lot of pixels to bunch and stretch. But honestly, most of the time this is plenty to work with. If you are smart about how you construct things this is not actually as bigger constraint as one might think it is.

What I mean by “potential board state permutations” is how many possible unique configurations can be made in any given level. So for example.

These two levels have the same kana, and the same starting positions but the first level is significantly easier than the second because the number of possible configurations of kana has been significantly reduced. Forgive me if my maths is wrong but the level on the left has only 120 unique board positions, whereas the level on the right has 362880 unique board positions. And while an advanced player can see through all the unnecessary information in the second level, it doesn’t actually make the puzzle any more fun for the advanced player because in both scenarios, the solution only requires two moves. So while you are giving advanced players a disappointing level, you are giving new players a level that is so information dense they will almost always solve the level by brute forcing the solution. What I’m trying to convey here is that when designing puzzles you need to control the amount of possible states so that you can guide the player to the solution. Now for more advanced levels its fine to offer levels that are more open ended, but you do need to be very sparing with how you do so.

Next up is the number of potential solutions. This category is a tricky one as personally I feel as though levels with multiple solutions make the level harder, not easier. Why you might ask? Well because it means that your players are less guided towards the optimal solution. It means they are more likely to get caught on unintentional red herrings. It also means that if the player wants to get a gold medal for a level, but they have only ever completed the level using an alternate solution that is more move intensive than the planned solution, they could spend way too long trying variations on the “wrong” solution. Really this is a side effect of having too many potential board state permutations, but every now and again its fun to have levels that offer multiple answers. Lots of levels in Kana Quest only have one solution, and lots of levels have multiple, the important thing is using this technique intentionally.

The final technique that I can use to control the difficulty for the player is probably the most important one. And that is complexity of solution. If the solution only requires two or three moves, its not a particularly complex solution. This usually means that the level isn’t super difficult. However, completion critical moves increase the complexity. A completion critical move is a move that if not made, the level cannot be completed.  Of coarse this can then be balanced with previous techniques. For example.example3

This is a level from world 1. And is in my opinion one of the best levels in that world. This has a very low complexity of solution, but in contrast to the all the levels before it, it has a slightly higher difficulty. But that difficulty comes from a larger number of potential configurations, multiple solutions, and a larger level size. The result is a level that isn’t too difficult, but does force the player to stop and think about the solution. But as the game ramps up in difficulty, ramping up the complexity of the solution is usually the safest way of doing so. Why is that? Well, it means you can control the amount of information you throw at the player to a far greater extent. Remember, you don’t want to overload the player with information, if they do they just start brute forcing the puzzles and have a bad time.  So an example of a good level made by giving the player a complex solution is this level.examplesolution

The reason this level is good is because it requires a good amount of moves to complete, and there are only two completion critical moves required (using the Slime Kana on the correct Kana), and those moves can be executed by the player at any point. Whereas, here is a level that has gone way too far on the complexity of solution.example3

This level is way too hard and is to date the most difficult level I have made. And the reason is, that every singe move in this level is a completion critical move that requires being done in the exact right order. If you make one wrong move, you cannot complete this level. The fact that this level has a relatively constrained number of possible configurations is its only saving grace. And I wouldn’t be surprised if I remove, or rework this level before the launch of the game.

I think the real take away from this blog if you are making, or thinking of making your own game is; What are the different vectors for making a game difficult? Are there enough? Are there too many? What are the implications of using one of those vectors? What are the implications of using multiple of those vectors at once? How far can one push any and all of those vectors before a game becomes impossible? And most importantly, at any point in a game, what vectors of difficulty does the situation call for?

Anyway, these are the things that I’ve been thinking about for the last month or so. I’ll see you next month. If you have any questions about game difficulty or you disagree and you want to start a discussion, feel free to leave me a comment and we can have a chat. Until next month, take care.

Hi all and welcome back to the Kana Quest devblog!

This last month was a busy month for Kana Quest development because for the first time, we’ve had to deliver to an “official” deadline. There have been unofficial deadlines before, like PAX and AVCon last year, but those deadlines were a bit fuzzier. They were more “make sure your game is in a presentable state by this time” sort of a deal. This deadline was much more concrete.

So what was this deadline? Well as a part of receiving funding from Film Victoria I have to complete milestone reports to prove to them that their money is being well spent and that I am on track to completion. For this milestone I said I would have the game’s art complete, and the game’s mechanics complete. And… we got there. All that remains at this point in time is bug fixing, level design, tutorials and balancing. That’s actually still quite a lot of things but lets not focus on that. Let’s focus on fun stuff. Like the full list of all the different kinds of Kana in the game!

STONE KANA: These poor kana have been turned to stone, and thus cannot move.

CtStoneHa


MYSTERY KANA: Look at these shifty looking Kana. They’re hiding something… Oh wait they’re hiding their true face! Pay attention to what they do and do not match with to discover their true identity.

mystery


ONE DIRECTION KANA: These Kana can only be moved in one direction. They have a big arrow on their head showing which way that is.

OneD


ICE KANA: These Kana have been encased in super slippery ice. They will keep moving until they can’t. Getting them to go where you want can be challenging.

IceDemo


GHOST KANA: These kana have lingering regrets. Mostly not wanting to pass onto the other side. But that’s no problem, you can bring them back to life if there’s enough friendship to go around. Make a chain of Kana the length of the number on a Ghost Kana’s head and they’ll come back!

GhostKana.gif


SLIME KANA: These gooey Kana don’t like to make friends. But they do like helping other Kana! Attach one of these Kana to any other to change their vowel sound!

SlimeKana

PARALYSIS KANA: These Kana are sick! You can move them once before they turn to stone!

Paralysis


BLUE SLIME KANA: These Slime Kana are a bit picky in which Kana they help. They will only help Kana with an “i” sound. But once they are attached the affected Kana will have two different vowels to match with other Kana. This mimics how the “y” sounding letters in Japanese attach to “i” ending kana to create blended sounds.

Eg. (yo) よ + (ki) き = (kyo)きょ (as in Tokyo)

YaSlimeKana


SHAPE-SHIFTER KANA: These Kana can become anything! Whatever you need them to be, they can be it!

Transform


EVIL SLIME KANA: These Slime Kana nice like the others. They are angry and will stop you from completing a level unless they are attached to another Kana. But they make it harder for you to match with other Kana. This mimics the tenten and maru symbols in Japanese. You attach these symbols to letters to change the consonant. E.g. a (ta) た becomes a だ when you attach those two dots called tenten to it.

MaruKana


JERK KANA: This kana is called “n”. “n” for “n”obody likes them, because they are a jerk. They’re mean, they call the other kana names. They are so unpleasant that other kana cannot be happy if there is one near them. Fortunately there is a way to get rid of them. Move a jerk kana into this little portal thing and they will GO AWAY. Where do they go? Don’t worry about it.


And that is all the Kana! Its been a long road getting all of these in the game, and I can’t wait for you to figure out all the puzzles they are going to make.

Anyway, I’ll see you in the new year! Have a happy and safe holiday season, and from me and the Kana “明けましておめでとう” (Happy new year in Japanese)trailerWIP2


Hi all, I’m Theo, the lead designer of Kana Quest. I’d like to introduce/reintroduce you to the Kana Quest DevBlog.

Why do I say “introduce/reintroduce”? Well the answer is this is the first Devblog I’ve done for Kana Quest in a while. And Secondly this will be the first Devblog that I will be sending it to everyone who has signed up to the Kana Quest mailing list. Which is something I am going to be doing from now on. And because I am going to be sending these blogs out on the mailing list, I am going to be making a few changes. Mostly being that I am not going to be posting these weekly like I used to. I don’t want to spam the inbox’s of people, and doing one a week was too much for me. So from now on, there will be a new Kana Quest devblog on the second Saturday of each month.

So for those who are new here, what can you expect in these devblogs? You can expect updates on how the game is coming along. Bits of news, interesting things that I’ve learned from making this thing, new features, and my general process.

So I’d like to start with the news. Lets get the bad news done with first, unfortunately Kana Quest will not be exhibiting at PAX Aus this year. Which to be honest is really bumming me out. What happened was that I was waiting for an inflow of cash before I booked a booth this year. And by the time the money came in, all the spots had been taken. If any of you were looking forward to playing the game there, I’m so sorry to have let you down.

But with the bad must come the good! And the good is that Kana Quest is no longer a solo project! I have my team member to come onto the project and I couldn’t be happier. As of this week the wonderful Reuben Covington is now the lead programmer for Kana Quest.

IMG_0277

Here’s Reuben helping me set up for AVCon (Anime Vid Con in Adelaide) earlier this year.

Reuben is an incredibly talented designer and programmer whospecialises in Collectable Card Game designs (and is also currently working on Infinity Heroes which you can check out here –> https://www.kickstarter.com/projects/elphie/infinity-heroes-competitive-card-game-for-mobile-p ). The reason why I think was my choice was because he has an incredible knack for bottom up design work. This is the sort of design that starts with a mechanic and iterates onto it to create great gameplay for the player. Whereas I am a Top Down designer. I start with a desired end goal and create mechanics to achieve the desired end goal (e.g. Wanting a puzzle game that teaches Hiragana/Katakana without any rote learning or pop quizzes). Both of these approaches I believe are super important, but they both have their drawbacks and strengths. Because of this, I am certain Kana Quest will be a better game with Reuben’s input. And hopefully, with his help, Kana Quest will hopefully be finished far sooner than later.

Speaking of Kana Quest being finished, when is that going to be? Well I know at PAX Aus last year I said that it would be in 2018. Sorry that’s not going to happen. But I wasn’t far off. The plan is to essentially finish the game in the first quarter of 2019. And now with Reuben’s help, I’m more than confident we can bring the game to you then!

What makes me so sure I hear you ask? Well for one thing, in terms of art assets, the game is a little over 80% complete! And for me, the most time consuming art assets to produce are by far the world art that go behind the puzzles. As of this week I have finished 11 out of 13. At my current estimates I am planning to have finished all the art by the end of October, or by early November at the latest. Speaking of art, here’s the world art for worlds 8-11.

World8pogoCat.gif

This one, was inspired by John Brack’s Collins St, 5pm. And you know… rush hour in Japanese train stations.

World8-9Transition.gif

Oh and this one is of the main street in Akihabara (The nerd capital in Japan). Along with some not so subtle Vaporwave jokes.

world10.gif

This one I mostly wanted to capture the feel of how lights reflect at night in big Japanese cities.

world11.gif

And this one is the obligatory reference to Hokusai. Fun fact, all games set in Japan by law legally have to include some reference to the Great Wave. *previously stated “fun fact” is in fact a fabrication*

I’m really proud of all the art that I’ve made for Kana Quest so far and I feel like I’ve come a LONG way as a pixel artist since I started. And I can’t wait to show you all the last two worlds. I am going all out for them.

But speaking of my pixel art coming along a long way since I started. For some of you who might have seen Kana Quest at PAX last year you might not have seen that I have changed the logo. Why is this? To those of you who’ve seen the game at an event this year, this will be the same logo that you’re used to. And if that’s the case, no I’m not going to upload the old logo because I don’t like it, and I like this new one much more.

KanaQuestLogoGifBorder

See, isn’t it pretty? I know I should be humble, but this logo was a lot of work and revision and I’m still kinda amazed I made something this cool.

This basically all I wanted to share with you all today. If you have a question about anything to do with the development of Kana Quest, please feel free to ask about it. I’d love to answer your questions. If you’d like to see more regular updates, you can follow the development on these social media channels:

Until next time, take care and have a wonderful day.


This was another week of working on funding applications so I don’t have a lot to share when it comes to Kana Quest. So instead I just wanted to talk about a design tool that I use to analyse new games when I play them. Just a heads up, this is just a lens to use when looking at video games. Just because a game looks bad with this lens, it doesn’t mean the game doesn’t have redeeming qualities and vice versa. This is just a way of looking at games that will allow you to see different strengths and weaknesses within games.

So what is this technique? I call it Game-Player Relationship Analysis. Basically, imagine the game you are looking at is a person. And what does the relationship that you have with this person (game) like? For example, the relationship you have a Pinball machine is similar to the one you have with a street performer. They entertain you for a few minutes and you give them a little bit of your spare change. Whereas a claw machine in your local shopping mall is closer to a shady figure playing a cup and ball game. They promise you a fair game of skill, but the reality is you are never going to win. The relationship you have exists entirely to con you out of your money.

In both the examples above I use this Game-Player Relationship Analysis to contextualize the differences of two outwardly very similar games. And more specifically how the two games try to obtain the player’s money. But how money is exchanged is only one type of relationship a game can have with its players.

  • Money Exchange Relationship
  • Time Exchange Relationship
  • Mid Interaction Relationship
  • User Defined Relationship

The Money Exchange Relationship as discussed before, is about personifying how a game goes about obtaining the player’s money. They can be like street performers who ask for a few minutes and a few cents. They can be like conman with the cup and ball game. They can be like a drug dealer who gives you your first hit for free, but then expects you to keep paying up to get your fix. They can be like your favorite worker at your local bookstore; you pay them 20-60 bucks and they give a book for you to read, consume, discard and repeat the process.

The Time Exchange Relationship is basically how the game treats the player’s time. Is the game respectful of the players time? Does a game demand a large time investment on the part of the player to make the relationship work? If yes, how does the game make it up to their players? Does the game send you constant notifications to remind you that it’s still there and that it needs your love and affections non stop throughout the day and throughout the night? Does the game punish you for playing on your own time? Does the game ask you to revolve your entire life around it? As a quick aside, recently a lot of the big publishers as well as free mobile games have been making a push for “live services” for all their games. And the thing that worries me about these games is that the Time Exchange Relationship that these games have are quite toxic. If you had a partner that demanded you spend a third of your day with them, destroyed your things if you didn’t spend time with them, and kept messaging you throughout the day regardless if you wanted alone time or if you wanted to see your friends, you would call that an abusive relationship. But these “live service” games do a lot of these things as standard, without considering the ramifications this can have on the player.

The Mid Interaction Relationship is how the player and the game interact during gameplay. For example Kana Quest was intended to have a Mid Interaction Relationship that mirrors that of a good teacher. A teacher that points out your mistakes but doesn’t punish you for them, and that masks boring rote learning with something more interesting. Of course whether or not I achieved this, is not for me to decide. But some games are like story tellers (Visual Novels) and others are like tour guides (open world games). Some are like strict personal fitness trainers constantly pushing you to get better (Dark Souls). Now technically the Mid Interaction Relationship is separate from the Money Exchange Relationship and the Time Exchange Relationship  but often there is an intersection between these categories. Especially with F2P (free to play) games where the gameplay is interrupted by adds or by running out of energy. And of course if a game is large enough to have a lot of desperate elements, the relationship you have with one of those elements can be different to the relationship you have with another of those elements.

The User Defined Relationship is where things get weird. See much like people, not everyone has the same relationship with the same person. For example the relationship I have with my mother will be very different from the relationship you (the reader) have with me (the author). See the other categories care about personifying the way that games interact with their players. This cares about the inverse. It is about personifying how the players interact with the game. This category is weird not only because everyone’s relationship is slightly different, but because the relationship changes with time. I used to play Pokemon to be taken on a wild adventure with the world’s coolest tour guide, but now I play Pokemon to catch up with an old friend.

So how can we use this for making better games? Well the long and short of it is to try and craft the most effective Game-Player Relationship possible for the game we are making. Have an idea of what sort of person you want your game to act like. Make conscious design and business decisions to achieve this. And of course play test with a lot of people to see if your game is interacting with them in the way you want. Don’t be surprised if play testers make Mid Interaction and User Defined Relationships that you didn’t anticipate. Just make sure that these relationships are positive.

If you find using this technique, your game sounds like an asshole that nobody would want to be around, then its quite likely that your game has a problem. And much like people, it’s okay if your game isn’t perfect. Sometimes business forces you to have a Money Exchange Relationship that’s a bit shitty, but you need to be able to make it up to your players elsewhere. Case in point, one of my personal favorite games is Magic the Gathering. It’s Money Exchange Relationship is awful, but the Time Exchange Relationship, Mid Interaction Relationship, and User Defined Relationships are all so good that for me its worth it.

However if you find yourself in a relationship with a game that constantly tricks you out of your time, and money, only to then not give you an experience worth having for your investment, then its time to dump that game. It doesn’t deserve you, and you deserve better.

 Anyway that’s the Kana Quest Dev Blog for this week. Hopefully by next week I will have finished my funding application and I can show off some new work to you all.  But before I go, have some completely unrelated Steven Universe fan art, because who doesn’t love a pretty picture. Anyway until next time, have a great week.pinkDiamondHighRes