Hi all, its another month and that means its time for another Kana Quest DevBlog!!
Like last month I have just been working on levels. But the big difference between this month and last month is that I am now SO CLOSE to finishing all the levels in the game! There are 13 worlds in a Kana Quest, I have finished making levels for 11/13, and the 12th world is more than two thirds complete. So we are in the home stretch here folks.
At this point I have had a chance to work with all the mechanics in the game and I thought it would be fun to talk about each in depth about the positive and negative elements of each.

And oh how the mighty have fallen. This is a Mystery Kana, and they were the first mechanic I made for Kana Quest, and I was so proud of it at the time. And I still think its a valuable thing to have in the game, but the more I used it the more utterly irritated I got when I play-tested any level with them in it. So why did I make them? Why are they important? And why are they so irritating? So I made Mystery Kana because I was having a very specific problem, players weren’t flipping over the Kana to learn the pronunciation to complete the levels in the first world. This is problematic because it would render the entire function of Kana Quest meaningless. So I needed a way to effectively force the player to look at them. Mystery Kana do that very well. They just also irritate the player at the same time. The way these things work is they cannot move, but can match. The player needs to keep track of what each Mystery Kana, does and does not match with. Then using that information, figuring out what the Kana’s true identity is. The biggest problem with Mystery Kana is they just simply break the flow of the game and force you make non optimal moves to figure them out, and then you can complete the level. The end result is they start to become a nuisance after a while, and its for this reason they get phased out after world 4.

The One Directional Kana have been a solid work horse throughout development. There are so many things about this mechanic that are excellent from a designer’s perspective. 1st is they are easy to understand from a player’s perspective. The arrow shows you what they do; they only move in one direction. 2nd is they have a huge amount of design space. Design Space is a design term for talking about how many different interesting configurations a mechanic can be used in. And these Kana allow for so many interesting levels to be made. I am still finding new and interesting ways to use these things even in the 12th world. They are also very flexible in how they can be used. If you want to build an entire level around them, you can and it will probably be a really fun level. But you can also just throw one of these into a level to help guide the player towards the solution. I suspect once I have finished making levels, and I’m in the polishing stage I will end up adding a lot of One Directional Kana for this exact reason. What’s more is they also have interesting interactions with basically every other mechanic. The only complaint I have against them is they can be very punishing of mistakes. The reason for this is if you move one spot too far and then make a bunch of other moves, you end up spamming the undo button more than is ideal.
The fourth world’s mechanic is the Ice Kana. These Kana will keep sliding in the direction you move them until they make an invalid move. These Kana are a good mechanic, but no where near as easy to work with as the One Directional Kana. They have a large amount of design space, they have interesting interactions with most other mechanics, and they can make some very fun levels. But the problem is that you can’t just through one of these into a level. Even if the Ice Kana is supposed to be a minor element to a level, you have to build the entire level around the Ice Kana to accommodate it. This is not a bad thing as it allows you to create a nice change of pace for the player at points, its just something that needs to be treated with care. Another small problem is they tend to demand levels be a fair bit larger than a similar level without them would be. Other than that, I think Ice Kana are great.

The Slime Kana are another mechanic in a similar vein of the Mystery Kana as they both play around the sound matching aspect of the game. And so what they do is they will change the vowel sound of any kana you use them with. However unlike the Mystery Kana, these do not get highly irritating after a while. The main reason for this is that they often feel like they are helping you, rather than getting in your way. And because of this is they can just be plugged into a bunch of levels to add a little bit extra. But the biggest weakness of them is that they struggle being the core element of a level. Where the Ice Kana can’t help but be a diva, the Slime Kana struggle with it. Another problem with the Slime Kana is that because the Kana that appear on them can only be Slime Kana it does mean that the Kana on them just get seen less than every other Kana. But the gameplay of them is still solid enough that I made two variants of them.

This is a Ghost Kana. Ghost Kana, cannot move and cannot match. But they will come back from the dead once the player has made a group of Kana equal or greater than the number on their head. This is a tricky mechanic. And honestly they represent the biggest disparity between what its like to work with them, compared to what its like to play with them. Because playing with them is honestly pretty good. They make interesting scenarios, and force you to think about the level in a different way. But from a designer’s perspective these things are so hard to work with. You have to engineer levels so carefully around these to make them fun for the player. They have very limited amounts of design space too, so I honestly struggled to finish the world where these were introduced. And what’s worse there are some mechanics that this straight up does not work with.

So this is the first of two Slime Kana variants. This is a Blue Slime Kana. Blue Slime Kana are different because they only ever attach to Kana that end with an “i” sound… and they add an additional vowel to match with rather than completely changing the vowel. This is because of an actual function in Japanese. See Blue Slimes can only have the following letters や/ゆ/よ. And these letters can attach to other letters to make slurred sounds. For example き(ki)+や(ya) = きゃ(kya). So きゃ will match with “i” ending kana, “a” ending kana and “k” starting kana. This makes the mechanic quite satisfying for the player to use because it opens more doors for them than regular Slime Kana do. And its for this reason that they can be a bit frustrating to design around as a game designer. Another problem with them is they have to attach to a kana that ends with an “i”. This over the course of the game makes “i” ending kana being over represented in comparison to other kana. Whats more is that often you have to design levels in which fully utilise the multiple vowel sounds. But this often leads to further exacerbating the over represented “i” problem. But other than these issues, these kana have all the strengths of regular slime kana. And they allow me to illustrate an important part of reading Japanese.
 These are the Paralysis Kana. They can be moved once… but after that they turn to stone and cannot be moved. These are probably my second most useful mechanic, just after One Directional Kana. They allow for interesting level design, and they have a good amount of design space to them. Not quite as much as One Directional Kana, but still a large amount. They are also very easy to understand what they do. And they can be the focus of a level, or be used as a back up element. The biggest problem that they have though is they have a hard cap on how difficult they can make a level. This isn’t a bad thing as it does mean it’s basically impossible to make a level that is too difficult with these but it does make them a bit more restrictive as one might like in later levels.

Transform Kana are pretty straight forward. Then can become any Kana, but they can only be one Kana at a time. This mechanic probably has the least frills of any of my mechanics, and you what that’s ok. It works just fine. They ask a simple question of the player, and that question is “where am I needed, and what do I need to be?”. So the trick to designing around these Kana is making sure there is a spot that can only be connected with a Transform Kana. Which is fine as long as one is careful with the other Kana that are used within the level. If you aren’t careful the player will just plop the transform kana anywhere and not have to think at all. They also suffer the same problem that Slime Kana face in that they struggle to be the focus of a level, but they do slot into lots of levels pretty easily.

Here is the final Slime Kana variant. And this is yet another instance of me basing a mechanic off an actual function in Japanese. There are small added strokes called “tenten” and “maru” for Hirgana and Katakana. These will change the consonant of the letter they are attached to. In the game this often is something that is a disadvantage, not an advantage like the other two Slime Kana. Because of this you cannot finish a level if there are any Purple Slime Kana left in play. This forces the player to find the part of the level that can accommodate losing its consonant sound. Basically everything that applies to the first two applies to this one.

This is an “n”. Because they don’t share a consonant or a vowel with any other Kana they cannot match like a normal Kana. So I decided to make them the Unfriendly Kana that all other Kana hate. So for as long as an “n” is in the level, you cannot complete it. So how do you get rid of an “n”? You dump them into a rubbish bin. Which looks like this.

Once an “n” is moved into a rubbish bin both are removed from play, and the spots they occupied become empty spaces on the board. This mechanic requires a fair bit of set up to get working, but once you set up a level to accommodate them its a solid mechanic that has a solid amount of design space. One unique problem with this mechanic is using effectively uses up twice the amount of space that a regular Kana would. Because of this levels with this mechanic tend to look very cluttered and can be a bit difficult to process. Outside these problems they are a solid mechanic that just needs a bit of preparation to make work.
Finally we have Kana Sliders. The art for these is still under way, but what these do is they move every Kana in a row or column down one spot as long as there is an empty spot on the board in that direction. This is a very easy mechanic to design around and offers a lot of design space that had not been available for me for most of the game. Because Kana Sliders care about empty space, it allows them to interact with Slime Kana and Unfriendly Kana that no other mechanic has been able to do so far. The biggest problem with them however is they tend to make levels with ridiculous amount of moves required to complete them. There are levels that require more than 70 moves to complete with this mechanic. This can be problematic especially if the player makes a mistake early on as they will be punished especially hard for that error. Other than that issue, I love working with Kana Sliders.
And with that this weeks Kana Quest Devblog comes to a close. Next time I think I’ll pick out a handful of choice levels, analyse them, talk about how I made them, and talk about why I think they are special.


 The main gameplay of Kana Quest revolves around Kana. The word Kana comes from the names of the two Japanese Alphabet; Hiragana and Katakana and basically means letter. In Kana Quest, the Kana have been brought to life and want to make friends. Its the player’s job to help them find their friends. Two kana that are next to each other will be friends if their names/pronunciation share a sound. So for example か (Ka) and な (Na) will be friends because they both have an “a” sound. The same is true for か (Ka) and く(Ku) because of the “k” sound. Once you know which Kana can be friends, you need to make a friendship group that includes all Kana in the level.
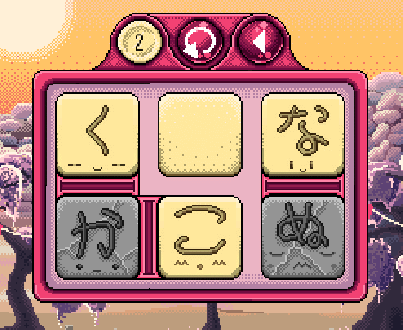 For example. This level starts off with every Kana having at least one friend. But because these friendships don’t connect all the Kana into one group the level is not complete.
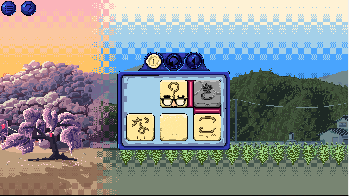 Mystery Kana: These enigmatic Kana are hiding their true face. But their true identity is given away by who they become friends with. Unfortunately Kana who are hiding their true identity are not truly happy and must be unmasked before the level can be complete.


