Archives for posts with tag: GIF

Well its been a month. A whole lot has happened. But most importantly as I’m writing this… I am in Japan. The place where Kana Quest began. So this month we are going to look at my journey through Japan and look at some of the places that Kana Quest drew inspiration.


First up is the flight over. Not too much to talk about here, but the first stop in my travels was Cairns. Can’t get to Osaka without going through it. But I had enough time in my lay over to get some work done on Kana Quest, and charge all my devices up again for the next leg.

Speaking of the next leg, I got off at Osaka. Now I don’t mean any disrespect to Osaka. But I am honestly not a huge fan of Osaka. I personally have never really enjoyed myself any time I’ve been there, so I got off my plane. Headed straight to my hotel. Passed out. And got on a train to Kyoto the very next day. Which is good because in Kyoto was one of the main reasons I was in Japan: BitSummit.

IMG-1094So I tried to exhibit at Bitsummit this year, and unfortunately I was not successful. But I did decide that it would be worth heading over there and meeting some new people, playing some sweet new games, and learning some new things. I do want to give a shout out to Andrew (@DigDugpa), Shawn (@auberginenasu) and Lena (@Crowbeak) who took took me under their wing and introduced me to folks. The show was really cool and there were some really sweet games, and there was a surprisingly large amount of Aussie devs there. There was Necrobarista, Unpacking, and Frog Detective. The dev for Rising Dusk; Lukas Stobie was also there.IMG-1095 (1)

But once the show closed on Saturday, it was time for a Bitsummit tradition… The River Party. Devs, volunteers and attendees converge down on the Kyoto riverbank and just chill. Now the photo below is what the river bank usually looks like…IMG-1097

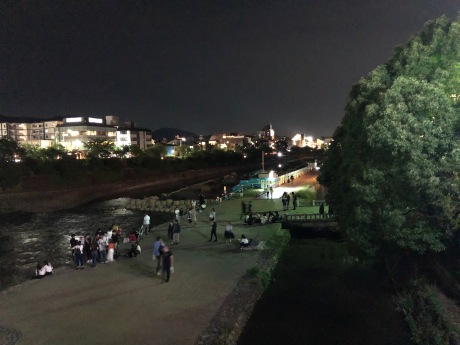
And this is what the riverbank looked like with all of us down on it.

IMG-1099 (1)

It kind of amazes me that we had a group of people this large (most of whom were drinking), and the cops were not called. I mean no one was doing anything awful, but a group of folk that large is going to be loud. And I can only assume that it eventually got annoying for the locals who were just trying to walk along the river bank.

But all good things come to an end, and so did Bitsummit. But I still had a bunch of time in Kyoto. So what did I do? I went to tourist destinations and drew.

Pictured above is Arashiyama. The place where that iconic bamboo grotto is. But I have always loved this view of it, from the outside. There are way less people, and its still just as beautiful.

I also went to Kiyomizudera. Which is the most iconic Buddhist temple in Japan. Unfortunately for me the temple its self was under restoration so it was covered in scaffolding.IMG-1128

But fortunately for me, I actually went there primarily for the sake of seeing all the small little alley ways that lead up to the temple. See Kyoto is one of the few places in Japan where you can still see traditional Japanese buildings still in good condition (you can see them in rural Japan, but they are often a bit run down). And let me tell you, the alley ways leading up to Kiyomizudera are just stunning in their own right.IMG-1123IMG-1125

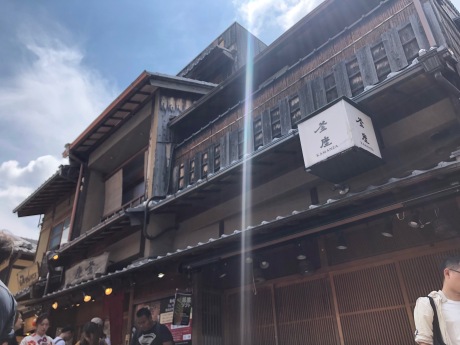
I mean just look at them, they are gorgeous. I wanted to do a world in Kana Quest that referenced these alleyways, but due to the parralaxing backgrounds it would have been near impossible to execute them in a way that would have looked good.

Once I finished mucking around in Kyoto, it was time to go home. And let me tell you, home had not changed one bit. It was exactly as I remembered it. The clouds were even doing my favourite thing where they covered the tips of the mountains. Of course when I say home I mean where I lived. A small town called Wadayama in the dead centre of Hyogo prefecture. Below are some pics of my neighbourhood.  

If you were wondering where the first four worlds of Kana Quest came from, this is where they came from. While they don’t look exactly like the real world inspiration, what was more important to me was that the worlds made me feel like I was back here.

But then we have the cherry on top of my nostalgia sundae. The shitty box I lived in for a year. Now the pics just below don’t look that bad… that’s because the moment I moved out. They gutted the insides, repainted the outside and landscaped the surrounding area. Because let me tell you, when I first got there, there was mould everywhere, there were spider webs in my stove top grill, there was a large plastic bucket where a shower should have been (actually that one never got fixed while I was there), and the fridge that I had been left was not working…. And yet… god it was good to be back home.

Also, see that car parked in the third picture? That’s where I used to park my car. But something you cant see so easily is that there is a full two feet drop on the left hand side of that car. So driving into that thing was terrifying because if you messed up… your car was gonna end up on its roof.

IMG-1257

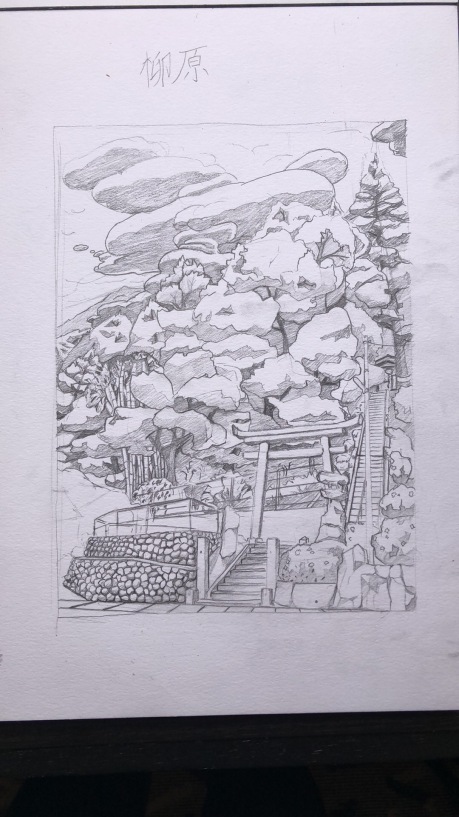
I also decided to do a drawing of the little park next to my home. When I moved in one of my coworkers asked me if being next to the shrine bothered me. She didn’t understand me when I said that I quite liked it because she thought it was scary. Still to this day I think I was very lucky to have something so beautiful next to where I lived.

Now this is starting to get a bit long so I might start wrapping it up. But before I do we are gonna do a few last rapid fire pics and what they are and why they are important.

IMG-1333

My fav Pokemon gets its very first official plushie from the Pokemon Centre, and I am so stoked.

IMG-1328

The Hiroshima Genbaku Dome. I was planning on drawing this one, but when I got there I found it a bit too upsetting to draw. Especially when you look at the pictures of the immediate aftermath and you can see the landscape around you as being nothing but complete devastation, I just found it a bit too much.

IMG-1303

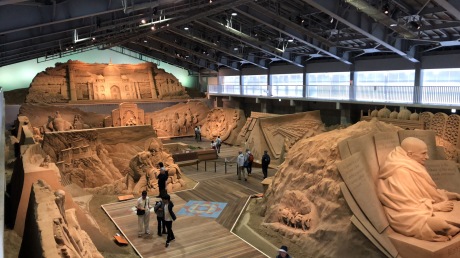
The neighbouring prefecture to my Hyogo to the north west is Tottori prefecture. Which has the honor of being the least populous prefecture in all of Japan. What does it have? Honestly not a lot apart from a lot of natural beauty and sand. Seriously look at these sand sculptures at the Tottori sand museum!

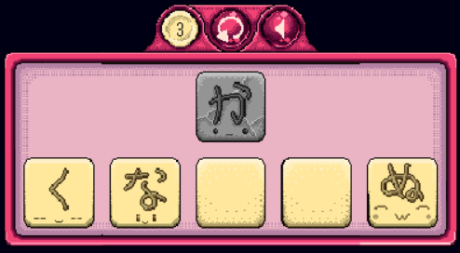
Finally, I have actually been getting some work done while I’ve been over here (I know it doesn’t look like it). Unfortunately most of it isn’t ideal for showing off. But the art for the final mechanic in Kana Quest is now finally implemented. KanaVeyorBeltFinished

In terms of other Kana Quest news, our composers Julian and Leina are working damn hard on the music and I cannot wait to share it with you. And I might get them to write a devblog in the future about what they were trying to achieve with their music.

And with that, that’s all I got for this month. We are going to keep working hard on Kana Quest as we get ready for release later this year. I’ve had a few folk ask me if there is anything they can do to help the game leading up to release. And the answer is pretty simple, tell your friends about Kana Quest. You telling your mates to get excited for this game will do more than anything I do here on this devblog.

Until next time. Take care all!


Hi all, its another month and that means its time for another Kana Quest DevBlog!!

Like last month I have just been working on levels. But the big difference between this month and last month is that I am now SO CLOSE to finishing all the levels in the game! There are 13 worlds in a Kana Quest, I have finished making levels for 11/13, and the 12th world is more than two thirds complete. So we are in the home stretch here folks.

At this point I have had a chance to work with all the mechanics in the game and I thought it would be fun to talk about each in depth about the positive and negative elements of each.

mystery

And oh how the mighty have fallen. This is a Mystery Kana, and they were the first mechanic I made for Kana Quest, and I was so proud of it at the time. And I still think its a valuable thing to have in the game, but the more I used it the more utterly irritated I got when I play-tested any level with them in it. So why did I make them? Why are they important? And why are they so irritating? So I made Mystery Kana because I was having a very specific problem, players weren’t flipping over the Kana to learn the pronunciation to complete the levels in the first world. This is problematic because it would render the entire function of Kana Quest meaningless. So I needed a way to effectively force the player to look at them. Mystery Kana do that very well. They just also irritate the player at the same time. The way these things work is they cannot move, but can match. The player needs to keep track of what each Mystery Kana, does and does not match with. Then using that information, figuring out what the Kana’s true identity is. The biggest problem with Mystery Kana is they just simply break the flow of the game and force you make non optimal moves to figure them out, and then you can complete the level. The end result is they start to become a nuisance after a while, and its for this reason they get phased out after world 4.

OneD

The One Directional Kana have been a solid work horse throughout development. There are so many things about this mechanic that are excellent from a designer’s perspective. 1st is they are easy to understand from a player’s perspective. The arrow shows you what they do; they only move in one direction. 2nd is they have a huge amount of design space. Design Space is a design term for talking about how many different interesting configurations a mechanic can be used in. And these Kana allow for so many interesting levels to be made. I am still finding new and interesting ways to use these things even in the 12th world. They are also very flexible in how they can be used. If you want to build an entire level around them, you can and it will probably be a really fun level. But you can also just throw one of these into a level to help guide the player towards the solution. I suspect once I have finished making levels, and I’m in the polishing stage I will end up adding a lot of One Directional Kana for this exact reason. What’s more is they also have interesting interactions with basically every other mechanic. The only complaint I have against them is they can be very punishing of mistakes. The reason for this is if you move one spot too far and then make a bunch of other moves, you end up spamming the undo button more than is ideal.

IceDemo

The fourth world’s mechanic is the Ice Kana. These Kana will keep sliding in the direction you move them until they make an invalid move. These Kana are a good mechanic, but no where near as easy to work with as the One Directional Kana. They have a large amount of design space, they have interesting interactions with most other mechanics, and they can make some very fun levels. But the problem is that you can’t just through one of these into a level. Even if the Ice Kana is supposed to be a minor element to a level, you have to build the entire level around the Ice Kana to accommodate it.  This is not a bad thing as it allows you to create a nice change of pace for the player at points, its just something that needs to be treated with care. Another small problem is they tend to demand levels be a fair bit larger than a similar level without them would be. Other than that, I think Ice Kana are great.

SlimeKana

The Slime Kana are another mechanic in a similar vein of the Mystery Kana as they both play around the sound matching aspect of the game. And so what they do is they will change the vowel sound of any kana you use them with. However unlike the Mystery Kana, these do not get highly irritating after a while. The main reason for this is that they often feel like they are helping you, rather than getting in your way. And because of this is they can just be plugged into a bunch of levels to add a little bit extra. But the biggest weakness of them is that they struggle being the core element of a level. Where the Ice Kana can’t help but be a diva, the Slime Kana struggle with it. Another problem with the Slime Kana is that because the Kana that appear on them can only be Slime Kana it does mean that the Kana on them just get seen less than every other Kana. But the gameplay of them is still solid enough that I made two variants of them.


GhostKana

This is a Ghost Kana. Ghost Kana, cannot move and cannot match. But they will come back from the dead once the player has made a group of Kana equal or greater than the number on their head. This is a tricky mechanic. And honestly they represent the biggest disparity between what its like to work with them, compared to what its like to play with them. Because playing with them is honestly pretty good. They make interesting scenarios, and force you to think about the level in a different way. But from a designer’s perspective these things are so hard to work with. You have to engineer levels so carefully around these to make them fun for the player. They have very limited amounts of design space too, so I honestly struggled to finish the world where these were introduced. And what’s worse there are some mechanics that this straight up does not work with.

YaSlimeKana

So this is the first of two Slime Kana variants. This is a Blue Slime Kana. Blue Slime Kana are different because they only ever attach to Kana that end with an “i” sound… and they add an additional vowel to match with rather than completely changing the vowel. This is because of an actual function in Japanese. See Blue Slimes can only have the following letters や/ゆ/よ. And these letters can attach to other letters to make slurred sounds. For example き(ki)+や(ya) = きゃ(kya). So きゃ will match with “i” ending kana, “a” ending kana and “k” starting kana. This makes the mechanic quite satisfying for the player to use because it opens more doors for them than regular Slime Kana do. And its for this reason that they can be a bit frustrating to design around as a game designer. Another problem with them is they have to attach to a kana that ends with an “i”. This over the course of the game makes “i” ending kana being over represented in comparison to other kana. Whats more is that often you have to design levels in which fully utilise the multiple vowel sounds. But this often leads to further exacerbating the over represented “i” problem. But other than these issues, these kana have all the strengths of regular slime kana. And they allow me to illustrate an important part of reading Japanese.

Paralysis These are the Paralysis Kana. They can be moved once… but after that they turn to stone and cannot be moved. These are probably my second most useful mechanic, just after One Directional Kana. They allow for interesting level design, and they have a good amount of design space to them. Not quite as much as One Directional Kana, but still a large amount. They are also very easy to understand what they do. And they can be the focus of a level, or be used as a back up element. The biggest problem that they have though is they have a hard cap on how difficult they can make a level. This isn’t a bad thing as it does mean it’s basically impossible to make a level that is too difficult with these but it does make them a bit more restrictive as one might like in later levels.

Transform

Transform Kana are pretty straight forward. Then can become any Kana, but they can only be one Kana at a time. This mechanic probably has the least frills of any of my mechanics, and you what that’s ok. It works just fine. They ask a simple question of the player, and that question is “where am I needed, and what do I need to be?”. So the trick to designing around these Kana is making sure there is a spot that can only be connected with a Transform Kana. Which is fine as long as one is careful with the other Kana that are used within the level. If you aren’t careful the player will just plop the transform kana anywhere and not have to think at all. They also suffer the same problem that Slime Kana face in that they struggle to be the focus of a level, but they do slot into lots of levels pretty easily.

MaruKana

Here is the final Slime Kana variant. And this is yet another instance of me basing a mechanic off an actual function in Japanese. There are small added strokes called “tenten” and “maru” for Hirgana and Katakana. These will change the consonant of the letter they are attached to. In the game this often is something that is a disadvantage, not an advantage like the other two Slime Kana. Because of this you cannot finish a level if there are any Purple Slime Kana left in play. This forces the player to find the part of the level that can accommodate losing its consonant sound. Basically everything that applies to the first two applies to this one.

  DickheadKana

This is an “n”. Because they don’t share a consonant or a vowel with any other Kana they cannot match like a normal Kana. So I decided to make them the Unfriendly Kana that all other Kana hate. So for as long as an “n” is in the level, you cannot complete it. So how do you get rid of an “n”? You dump them into a rubbish bin. Which looks like this.

Bin

Once an “n” is moved into a rubbish bin both are removed from play, and the spots they occupied become empty spaces on the board. This mechanic requires a fair bit of set up to get working, but once you set up a level to accommodate them its a solid mechanic that has a solid amount of design space. One unique problem with this mechanic is using effectively uses up twice the amount of space that a regular Kana would. Because of this levels with this mechanic tend to look very cluttered and can be a bit difficult to process. Outside these problems they are a solid mechanic that just needs a bit of preparation to make work.


Finally we have Kana Sliders. The art for these is still under way, but what these do is they move every Kana in a row or column down one spot as long as there is an empty spot on the board in that direction. This is a very easy mechanic to design around and offers a lot of design space that had not been available for me for most of the game. Because Kana Sliders care about empty space, it allows them to interact with Slime Kana and Unfriendly Kana that no other mechanic has been able to do so far. The biggest problem with them however is they tend to make levels with ridiculous amount of moves required to complete them. There are levels that require more than 70 moves to complete with this mechanic. This can be problematic especially if the player makes a mistake early on as they will be punished especially hard for that error. Other than that issue, I love working with Kana Sliders.

And with that this weeks Kana Quest Devblog comes to a close. Next time I think I’ll pick out a handful of choice levels, analyse them, talk about how I made them, and talk about why I think they are special.

First thing’s first, I know I missed the January devblog. I’m sorry it wont happen again. But… it’s here now, and it’s a new year, which means this is the first devblog for 2019! This is going to be a big year for Kana Quest as this is the year we are going to release! Knowing the end is in sight is a strange feeling as I’ve been working on Kana Quest for the last two years of my life. But I hope you all will be there with me as we run headlong down this final stretch!

So what does this “final stretch” look like in terms of development? Well for me personally that means making all the levels. I had spent most of 2018 finishing the art and making all the visual assets, but in terms of gameplay, very little was being made. But now that I’ve finished all the visual assets and Reuben my programmer has finished programming in each mechanic, I am able to churn out levels very quickly. How quickly is that? Well since last month’s devblog, world 5, 6, and 7 now have all their levels made. Of course these levels still need play testing before they are 100% good to go, but they are playable, and reasonably balanced.

So, seeing as levels are all I have been doing this past month, I’m gonna tell you how I have been making them. And some of the weird things I have to pay attention to when I’m making levels.

The first thing I do when I start making a level is I figure out, how hard I want this level to be, and what kana I want the player to see.

flowchannel

Sorry if this is a bit too game design 101 here buuut… This is the flow channel. Flow is that feeling where you are in the zone. But getting the player into the zone requires very careful balance from the game designer. So something I’m sure you will notice when you play Kana Quest is that every three to five levels will build in difficulty, only to drop back a bit and then continue ramping up in difficulty.  The reason you do this, is that it’s just more fun for the player.

In Kana Quest there are a few different ways you can control the difficulty of any given level. They are:

  • The amount of Kana in a level
  • Size of the level.
  • Potential board state permutations
  • Number of potential solutions
  • Complexity of solution.

So lets go through each of them. And first up is the amount of Kana. So in my experience, you have a hard cap of about 14 -16 different Kana in a level. Why is this? This is because past this number, there is too much information for the player to comprehend. And personally, even I can’t process levels with this many Kana. It’s also a difficulty that isn’t a lot of fun for the player. Solving the puzzles is fun, recognising kana… not so much.

The size of the level like the amount of kana, also has a hard cap. This time its not so much about overwhelming the player though. The largest you can make a level in Kana Quest is 7×4. This is simply because if you make the level any bigger, it will not fit on the screen. I know that sounds silly, but due to the way pixel art works, there is no easy way to just “zoom out” without also causing a lot of pixels to bunch and stretch. But honestly, most of the time this is plenty to work with. If you are smart about how you construct things this is not actually as bigger constraint as one might think it is.

What I mean by “potential board state permutations” is how many possible unique configurations can be made in any given level. So for example.

These two levels have the same kana, and the same starting positions but the first level is significantly easier than the second because the number of possible configurations of kana has been significantly reduced. Forgive me if my maths is wrong but the level on the left has only 120 unique board positions, whereas the level on the right has 362880 unique board positions. And while an advanced player can see through all the unnecessary information in the second level, it doesn’t actually make the puzzle any more fun for the advanced player because in both scenarios, the solution only requires two moves. So while you are giving advanced players a disappointing level, you are giving new players a level that is so information dense they will almost always solve the level by brute forcing the solution. What I’m trying to convey here is that when designing puzzles you need to control the amount of possible states so that you can guide the player to the solution. Now for more advanced levels its fine to offer levels that are more open ended, but you do need to be very sparing with how you do so.

Next up is the number of potential solutions. This category is a tricky one as personally I feel as though levels with multiple solutions make the level harder, not easier. Why you might ask? Well because it means that your players are less guided towards the optimal solution. It means they are more likely to get caught on unintentional red herrings. It also means that if the player wants to get a gold medal for a level, but they have only ever completed the level using an alternate solution that is more move intensive than the planned solution, they could spend way too long trying variations on the “wrong” solution. Really this is a side effect of having too many potential board state permutations, but every now and again its fun to have levels that offer multiple answers. Lots of levels in Kana Quest only have one solution, and lots of levels have multiple, the important thing is using this technique intentionally.

The final technique that I can use to control the difficulty for the player is probably the most important one. And that is complexity of solution. If the solution only requires two or three moves, its not a particularly complex solution. This usually means that the level isn’t super difficult. However, completion critical moves increase the complexity. A completion critical move is a move that if not made, the level cannot be completed.  Of coarse this can then be balanced with previous techniques. For example.example3

This is a level from world 1. And is in my opinion one of the best levels in that world. This has a very low complexity of solution, but in contrast to the all the levels before it, it has a slightly higher difficulty. But that difficulty comes from a larger number of potential configurations, multiple solutions, and a larger level size. The result is a level that isn’t too difficult, but does force the player to stop and think about the solution. But as the game ramps up in difficulty, ramping up the complexity of the solution is usually the safest way of doing so. Why is that? Well, it means you can control the amount of information you throw at the player to a far greater extent. Remember, you don’t want to overload the player with information, if they do they just start brute forcing the puzzles and have a bad time.  So an example of a good level made by giving the player a complex solution is this level.examplesolution

The reason this level is good is because it requires a good amount of moves to complete, and there are only two completion critical moves required (using the Slime Kana on the correct Kana), and those moves can be executed by the player at any point. Whereas, here is a level that has gone way too far on the complexity of solution.example3

This level is way too hard and is to date the most difficult level I have made. And the reason is, that every singe move in this level is a completion critical move that requires being done in the exact right order. If you make one wrong move, you cannot complete this level. The fact that this level has a relatively constrained number of possible configurations is its only saving grace. And I wouldn’t be surprised if I remove, or rework this level before the launch of the game.

I think the real take away from this blog if you are making, or thinking of making your own game is; What are the different vectors for making a game difficult? Are there enough? Are there too many? What are the implications of using one of those vectors? What are the implications of using multiple of those vectors at once? How far can one push any and all of those vectors before a game becomes impossible? And most importantly, at any point in a game, what vectors of difficulty does the situation call for?

Anyway, these are the things that I’ve been thinking about for the last month or so. I’ll see you next month. If you have any questions about game difficulty or you disagree and you want to start a discussion, feel free to leave me a comment and we can have a chat. Until next month, take care.

Hi all and welcome back to the Kana Quest devblog!

This last month was a busy month for Kana Quest development because for the first time, we’ve had to deliver to an “official” deadline. There have been unofficial deadlines before, like PAX and AVCon last year, but those deadlines were a bit fuzzier. They were more “make sure your game is in a presentable state by this time” sort of a deal. This deadline was much more concrete.

So what was this deadline? Well as a part of receiving funding from Film Victoria I have to complete milestone reports to prove to them that their money is being well spent and that I am on track to completion. For this milestone I said I would have the game’s art complete, and the game’s mechanics complete. And… we got there. All that remains at this point in time is bug fixing, level design, tutorials and balancing. That’s actually still quite a lot of things but lets not focus on that. Let’s focus on fun stuff. Like the full list of all the different kinds of Kana in the game!

STONE KANA: These poor kana have been turned to stone, and thus cannot move.

CtStoneHa


MYSTERY KANA: Look at these shifty looking Kana. They’re hiding something… Oh wait they’re hiding their true face! Pay attention to what they do and do not match with to discover their true identity.

mystery


ONE DIRECTION KANA: These Kana can only be moved in one direction. They have a big arrow on their head showing which way that is.

OneD


ICE KANA: These Kana have been encased in super slippery ice. They will keep moving until they can’t. Getting them to go where you want can be challenging.

IceDemo


GHOST KANA: These kana have lingering regrets. Mostly not wanting to pass onto the other side. But that’s no problem, you can bring them back to life if there’s enough friendship to go around. Make a chain of Kana the length of the number on a Ghost Kana’s head and they’ll come back!

GhostKana.gif


SLIME KANA: These gooey Kana don’t like to make friends. But they do like helping other Kana! Attach one of these Kana to any other to change their vowel sound!

SlimeKana

PARALYSIS KANA: These Kana are sick! You can move them once before they turn to stone!

Paralysis


BLUE SLIME KANA: These Slime Kana are a bit picky in which Kana they help. They will only help Kana with an “i” sound. But once they are attached the affected Kana will have two different vowels to match with other Kana. This mimics how the “y” sounding letters in Japanese attach to “i” ending kana to create blended sounds.

Eg. (yo) よ + (ki) き = (kyo)きょ (as in Tokyo)

YaSlimeKana


SHAPE-SHIFTER KANA: These Kana can become anything! Whatever you need them to be, they can be it!

Transform


EVIL SLIME KANA: These Slime Kana nice like the others. They are angry and will stop you from completing a level unless they are attached to another Kana. But they make it harder for you to match with other Kana. This mimics the tenten and maru symbols in Japanese. You attach these symbols to letters to change the consonant. E.g. a (ta) た becomes a だ when you attach those two dots called tenten to it.

MaruKana


JERK KANA: This kana is called “n”. “n” for “n”obody likes them, because they are a jerk. They’re mean, they call the other kana names. They are so unpleasant that other kana cannot be happy if there is one near them. Fortunately there is a way to get rid of them. Move a jerk kana into this little portal thing and they will GO AWAY. Where do they go? Don’t worry about it.


And that is all the Kana! Its been a long road getting all of these in the game, and I can’t wait for you to figure out all the puzzles they are going to make.

Anyway, I’ll see you in the new year! Have a happy and safe holiday season, and from me and the Kana “明けましておめでとう” (Happy new year in Japanese)trailerWIP2


Hi all, I’m Theo, the lead designer of Kana Quest. I’d like to introduce/reintroduce you to the Kana Quest DevBlog.

Why do I say “introduce/reintroduce”? Well the answer is this is the first Devblog I’ve done for Kana Quest in a while. And Secondly this will be the first Devblog that I will be sending it to everyone who has signed up to the Kana Quest mailing list. Which is something I am going to be doing from now on. And because I am going to be sending these blogs out on the mailing list, I am going to be making a few changes. Mostly being that I am not going to be posting these weekly like I used to. I don’t want to spam the inbox’s of people, and doing one a week was too much for me. So from now on, there will be a new Kana Quest devblog on the second Saturday of each month.

So for those who are new here, what can you expect in these devblogs? You can expect updates on how the game is coming along. Bits of news, interesting things that I’ve learned from making this thing, new features, and my general process.

So I’d like to start with the news. Lets get the bad news done with first, unfortunately Kana Quest will not be exhibiting at PAX Aus this year. Which to be honest is really bumming me out. What happened was that I was waiting for an inflow of cash before I booked a booth this year. And by the time the money came in, all the spots had been taken. If any of you were looking forward to playing the game there, I’m so sorry to have let you down.

But with the bad must come the good! And the good is that Kana Quest is no longer a solo project! I have my team member to come onto the project and I couldn’t be happier. As of this week the wonderful Reuben Covington is now the lead programmer for Kana Quest.

IMG_0277

Here’s Reuben helping me set up for AVCon (Anime Vid Con in Adelaide) earlier this year.

Reuben is an incredibly talented designer and programmer whospecialises in Collectable Card Game designs (and is also currently working on Infinity Heroes which you can check out here –> https://www.kickstarter.com/projects/elphie/infinity-heroes-competitive-card-game-for-mobile-p ). The reason why I think was my choice was because he has an incredible knack for bottom up design work. This is the sort of design that starts with a mechanic and iterates onto it to create great gameplay for the player. Whereas I am a Top Down designer. I start with a desired end goal and create mechanics to achieve the desired end goal (e.g. Wanting a puzzle game that teaches Hiragana/Katakana without any rote learning or pop quizzes). Both of these approaches I believe are super important, but they both have their drawbacks and strengths. Because of this, I am certain Kana Quest will be a better game with Reuben’s input. And hopefully, with his help, Kana Quest will hopefully be finished far sooner than later.

Speaking of Kana Quest being finished, when is that going to be? Well I know at PAX Aus last year I said that it would be in 2018. Sorry that’s not going to happen. But I wasn’t far off. The plan is to essentially finish the game in the first quarter of 2019. And now with Reuben’s help, I’m more than confident we can bring the game to you then!

What makes me so sure I hear you ask? Well for one thing, in terms of art assets, the game is a little over 80% complete! And for me, the most time consuming art assets to produce are by far the world art that go behind the puzzles. As of this week I have finished 11 out of 13. At my current estimates I am planning to have finished all the art by the end of October, or by early November at the latest. Speaking of art, here’s the world art for worlds 8-11.

World8pogoCat.gif

This one, was inspired by John Brack’s Collins St, 5pm. And you know… rush hour in Japanese train stations.

World8-9Transition.gif

Oh and this one is of the main street in Akihabara (The nerd capital in Japan). Along with some not so subtle Vaporwave jokes.

world10.gif

This one I mostly wanted to capture the feel of how lights reflect at night in big Japanese cities.

world11.gif

And this one is the obligatory reference to Hokusai. Fun fact, all games set in Japan by law legally have to include some reference to the Great Wave. *previously stated “fun fact” is in fact a fabrication*

I’m really proud of all the art that I’ve made for Kana Quest so far and I feel like I’ve come a LONG way as a pixel artist since I started. And I can’t wait to show you all the last two worlds. I am going all out for them.

But speaking of my pixel art coming along a long way since I started. For some of you who might have seen Kana Quest at PAX last year you might not have seen that I have changed the logo. Why is this? To those of you who’ve seen the game at an event this year, this will be the same logo that you’re used to. And if that’s the case, no I’m not going to upload the old logo because I don’t like it, and I like this new one much more.

KanaQuestLogoGifBorder

See, isn’t it pretty? I know I should be humble, but this logo was a lot of work and revision and I’m still kinda amazed I made something this cool.

This basically all I wanted to share with you all today. If you have a question about anything to do with the development of Kana Quest, please feel free to ask about it. I’d love to answer your questions. If you’d like to see more regular updates, you can follow the development on these social media channels:

Until next time, take care and have a wonderful day.


Hi all! Welcome to the DevBlog for Kana Quest, where I document what I’ve been working for the week, and what I’ve learned along the way.

This week I did something I’ve never really had to do for Kana Quest before, and that is draw people in pixel art using very limited amounts of pixels. So this week we will go through the things I made and what the process for doing so was.

But firstly let me give you some context on what I’m making this for. So each world in Kana Quest has its own unique layered background art that repeats so that I can make use of parallaxing. I’m currently working on world 8 which is a homage to John Brack’s 5pm Collins St.

This slideshow requires JavaScript.

You can see in the original there are two rows of people. I’ve finished the first one, and am up to the second. And this is where this weeks topic comes in. See the people in the second row are going to be much smaller than the ones on the foreground and thus I have way less pixels to work with.

 Each of these people range from 21-39 pixels wide and 61 – 88 pixels tall. In other words they are all way smaller than any of the people at the front. Quick heads up, I’m not going to go over how I arrived at my pallet for these people. I’m going to focus on the drawing aspect for this week.

So where did I start with these? Well I started each with an idea of what the person should look like at the end. I know this sounds silly but just having an idea of what you want them to look like will help. I also made a conscious effort to make sure they would all look different from each other. But once I had an idea of what I wanted I would start with the head.

w8PersonHead

I wouldn’t go for anything super detailed, just a roughly head shaped blob. Then I would figure out what shape the head should be using what I was planning and using reference photos. Always use reference photos, if you are anything like me and have the imagination of a gold fish they will be your best friend. For this blog we are going make a caricature that you will probably recognise from sailor moon: the nerdy schoolboy with massive glasses.

neeeeeerd

Gurio Umino from Sailor Moon

For this character, I figured he would have a pretty large and round head. Which also helped create room for his big glasses. I also gave him a bowl cut to make his head even more ball like. Something that I noticed very quickly making these characters is when you have this few pixels shape is really important. You have to express as much as you can from the rough shape of things. This is why I chose glasses boy here as the example for this blog.

w8PersonHead

Once I had the rough shapes blocked out (the face, hair and glasses) it was just a matter of shading everything to give him depth. Now I am not using hard outlines for these people. You are free to do that for your own pixel art if you like, I’m opting not to because it is not in style for Kana Quest. Another thing to pay attention to while shading is to use your shading to imply shape and texture. For example on the glasses I use shading to show how thick and bulky they are. I also use skin shading to show the curvature of his face.

But of course this is just the face. As I said before, for each of these characters I started with the head and worked my way down. The reason I did this is because by starting with the face I can get a good sense of what sort of personality I want to depict. In the case of this one, I wanted him to be pretty stiff and awkward looking. I also wanted him in the classic Japanese School uniform winter blazer. So what I did is I created a basic shape of his body; in this case a rigid rectangle. Then I placed where the hands and feet would go. It’s always easier to place where you want the hands and feet to be and work back towards the body than the other way round. In this instance the hands and feet were just straight next to his body, so it would have been pretty simple either way. Then I drew in the outline of his blazer and finished with shading. Once again keeping in mind that we need to use shading to help the viewer infer what the shape of everything is.

w8PersonBody

And there we have it! A finished person. Now if you excuse me I have another five of these things to make before I can finish making this world.

Anyway I hope you’ve enjoyed this week’s devblog. I unfortunately wont be uploading a devblog next week as I will be exhibiting Kana Quest at this year’s Animaga in Melbourne. If you are coming, please come find me at in the indie game section, say hello and give the game a shot! But until next time, take care and have a great week!

Hi all, and welcome to the Kana Quest Dev-Blog for this week. This week I am going to show you a small part of Kana Quest’s pipeline. Specifically, the process I have to go through to add new world art onto the previous world. Which, full disclosure, is terrible. When I was making my parallax system I did not consider the fact that someone would have to use said system. And that someone would ultimately be me. How that slipped my mind as a solo game dev, I don’t know but here we are.

With that said, what do I mean specifically when I say I am adding the new world art onto the previous? Well a few weeks ago I talked at length about the process for creating the background art for the 6th world in Kana Quest. Isn’t it nice? But unfortunately I now have to get this art from Photoshop, into Unity.

World6WIP3

Legit, still really chuffed with how this art turned out. I would give myself a pat on the back if it weren’t for the horror I am about to inflict on myself.

And then once into Unity, get it to connect onto the previous world’s art. You would think this is easy. And it should be. But then you know… my coding exists sooo guess we can’t have nice things.

w5wip

I remember when I thought getting this world to connect was going to be easy.

See I can’t make them connect by putting the two finished images side by side and creating some transitional artwork. Because of one thing. All these environments use a parallax effect, so the point in which each part of the world will end in different places. And the only way for me to know exactly where that is, is to make a world’s art, implement it, then figure out where the end of that world will be, and finally create an end point for the art. But then we have to start worrying about the game objects that handle the parallax effect for the art, as well as trying to make the transition seamless by making transitional art. Like I said before, this is not a great pipeline. But on the bright side Franz Kafka is incredibly proud of me.

So let’s look at what everything looks like at the start of this “process”. This is the level select scene before I add any of world 6’s art.

5thWrldScene

As you can see in the first image the foreground images extend way further than the sky does. This is to compensate for the parallax effect moving these images faster than the ones in the background.

World5Gif

As you can see in game, everything lines up and looks nice, unlike how it does in their initial placement. Remember, as long as the player doesn’t see your garbage fire you can just pretend it doesn’t exist.


So the first job I need to do is figure out the point that the transitional art will start. This is pretty easily figured out by scrolling to the end of the world and seeing roughly where the camera ends.

5thWrldScene2

The arrow is pointing to the effective end of world 5 because it is the point where the last level button appears to the player. So everything beyond this point will be used to transition to the next world.

So now that we have our end point we have to start making transitional art. I start with the sky because we want it to the first to change. The sky moves the slowest and thus will be the last to finish switching over to the new pallet (even with a head start). Making the transitional art is also really easy as it just involves dithering between the original colours to the new colours, like so. It’s vital to give yourself easy goals to score. This will lull yourself into a false sense of security, and get you thinking “Surely its not as bad as I remember”.

W5SkyEnd

5thWrldScene3

As you can see here, the transitional sky image cuts a little bit into world 5. 

Then we repeat this process for each layer in the world. So for this world we do it for the buildings, the park, the stalls, the lanterns and finally the ground. Each layer should be staggered a little bit so that the final result should look something like this.

5thWrldScene4

You can see how the off screen starting point for the transition art is staggered so that the foreground images start further away. But by the time the player scrolls past they will all line up and look great. Remember, as long as the player doesn’t see your garbage fire you can just pretend it doesn’t exist. 

But this is just for the transitional art. Once we have the transitional art in place we have to position the world 6 art to line up properly. But because the parallax effect is handled by different objects for each world, you can’t line up the images in the inspector and call it a day. I have to figure out where those images have to be so that once moved by the parallax script in game, they line up. But in the scene viewer, the final positions overlap and look pretty awful. This step is the most time consuming and irritating as its like putting together a jigsaw puzzle except all the pieces are moving and you don’t get to see their true position when you want to place a piece. But at least the result is a nice clean transition. Remember, as long as the player doesn’t see your garbage fire you can just pretend it doesn’t exist.World6ImplementedGIF.gif

So how would I improve this pipeline? Well I would start by improving the parallax script. If I had designed the parallax script to handle all the worlds at once, a lot of this irritation would be improved. Because then I could simply place the transition images where they need to be in the Scene Window and not have to switch between running the game to figure out the placement and then back to the Scene Window to position things correctly.

Secondly if I had fixed world lengths for each world I would be able to standardise the interval between each world’s images and thus be able to immediately place new world images by entering that interval into the Transform component’s X value.

Thirdly I could make the parallax script run in editor so that wherever the Scene window is looking at, the script will get that X value and parallax as if the camera was in that position. But once again this relies on there only object that handles the parallaxing.

Anyway I hope this this been an “fun” look at Kana Quest’s pipeline and hopefully it inspires you think about your pipeline and the inefficiencies built within it before you start production. Because that is one of the biggest mistakes I’ve made with Kana Quest. Ensuring quick and easy implementation of things is something worth spending a fair amount of time to work out. If you don’t get it sorted it can and will cost you days, weeks and even months of development time. And if you are really careless, you could end up writing a Dev-Blog about “The World’s Most Irritating Jigsaw”.

Until next time, have a great week.

Hey all, This week we are going to do a review of the Ice Kana mechanic. We’ve done one of these reviews before for the One Direction Kana. Basically what we are going to do is discuss how the mechanic works, how difficult it was to implement, how it plays, and how much design space it has.

So how do Ice Kana work? Ice Kana can be moved in any direction freely but will keep moving the direction they were moved until they hit a non-moving Kana, a blank space, or the end of the level.IceTileDemo2.gif

Ice Kana cannot be moved with each other as if they could there would be situations where tiles would move forever. Also whenever an Ice Kana is moved, regardless of how far they move it is counted as only one move.


So how hard was it to implement Ice Kana into the game? The initial implementing wasn’t too bad. The debugging was the killer for this one. They way the game handles Ice Kana is by checking if either of the two moved Kana are Ice Kana, then if there is an Ice Kana it iterates the “move Kana” script until the Ice Kana makes an invalid move. This was pretty easy to do as it relied on preexisting logic that was solid. The hard part was managing the undo function.  The undo button will log each step of an Ice Kana’s movement as individual moves so I have to tell script at what points an Ice Kana is moved so It can group each of those moves together and undo them all at once. This part of implementation was a nightmare. The last point that was a hassle was the animations. See because I have the Kana faces animated, whenever I want a different set of images for a different mechanic I am forced to make new animations for them. But I hear you saying “Isn’t that a LOT of individual animations?”. Why yes it is. There are 46 base Hiragana, but I have to double that number for each Katakana. Okay so there are 92 animations? Nope, because I have that many animations for EACH mechanic that uses the animation system. So far that is normal kana, stone kana, ice kana, paralysis kana and slime kana. Now slime kana only actually has 16 animations because it is only applies to あ、い、う、え、お、や、ゆ、and よ (I’ll go into why when we review slime kana). But even if we take that into account we still have 384 individual animations. And let me tell you Unity is NOT DESIGNED to have that many animations going on at once. TryingToAddNewAnimations

See this clip is how you add a new animation into Unity. You have to scroll down the list of existing animations until you get to the bottom where you can select the “Create New Animation” button. It is one of the most infuriating experiences I have as a game developer.


Anyway, but I don’t have to worry about implementing it anymore! How does it play? Actually pretty good, it can make some really interesting levels. However Ice Kana are certainly the hardest mechanic in the game for the player. Which I’m fine with. The first three worlds are pretty easy and its good to have a mechanic that can really challenge the player. Personally I enjoy solving these puzzles but what I enjoy and players enjoy are often two different things. So I will still have to do a bunch of testing to make sure the world 4 levels aren’t too difficult. I know for sure that the last two levels of world 4 are by far the hardest in the game.

IceTileDemo3.gif

But I think if I can get the difficulty correct I think players will really like Ice Kana. It will just take a bit of tweaking and balancing to get there.

Finally, how much design space does the mechanic have? Well, LOADS this was one of the first times I finished making a world’s levels and thought “I could probably make another ten interesting levels here”. They interact with One Direction Kana wonderfully, and I am certain they will work really well with future mechanics yet to come. So I am really happy with how they’ve turned out. My one biggest concern is just how difficult players find them.

Wrapping up. I think Ice Kana are a great mechanic that I will probably end up using liberally in future levels, but I do need to be careful of the difficulty. Having some levels be a challenge is fine, but not if players find their brains melting. And while debugging them was a royal pain, I am very happy with where they have ended up.

What do you think of the Ice Tiles? Let me know in the comments! But until next time, have a great week!

Hi all, welcome to the Kana Quest Dev Blog, after two weeks of forgetting that this is something I do I’m back. Truly I am the most consistent of self marketers.

Self deprecation aside, what are we talking about today? We are going to talk about the background art for world 4 got made, and what I learned along the way.

So before I started work on Kana Quest I had never worked with Pixel Art before. Not because I didn’t like it, just because I’d never given it a go. As you can expect this caused me to have quite the learning curve. I didn’t know about many of the common techniques, hell I didn’t even realize you were only supposed to use as few colors as possible (The first world is really bad for breaking this rule). But each world I’ve done, I’ve gotten a little bit better at it.

So what did I do differently for this world? Well for a start I used much fewer colors in sky. All previous worlds I had five colors making up the sky colors (most of which I would not reuse). This time I condensed that down to three (not including the purple at the top there as that has to stay consistent between worlds now for GUI reasons). And all three of those colors would be reused in the rest of the scene.

world4wip1

At this point this image only contains 8 colors, much fewer than my previous worlds.

Here you can see me start to reuse the colors already, the city buildings used the fuchsia at the bottom of the sky, and the roofs of the foreground buildings used the icy blue from the top of the sky. Speaking of reusing things, I got to reuse those foreground buildings. Copy pasted straight from world 2, scaled down, and recolored.


world4wip2

And with the station, the number of colors total is 14.

For the train station I used a lot of reference photos of other pixel artists to help get the effect I wanted. I know its nothing to be ashamed of (using reference photos) but I always try to do it without even when I shouldn’t. This is more for me than anyone else but, Always use reference photos, it makes life so much easier.

A couple of small details to look out for in the train station. The train shelter has my name written on it (テオ = Teo, basically the closest you’ll get to “Theo” in Japanese). The vending machine says うまい (umai) which means yummy, and the train station says 竹田 (Takeda). Which is the name of one of the towns in the area of Japan that I lived. I would have put down 朝来 (Asago, which is the name of the area I lived) or 和田山 (Wadayama the town I actually lived in), but I couldn’t write either with the number of pixels I had available.

World4Finished.gif

The finished background art. Total of 16 colors.

The final thing I added was some more frost on the train tracks and some clouds. I added one new color for the shading of the clouds and let that color have a pretty high contrast to the rest of the clouds. Something I’m still getting the hang of with pixel art is the need for higher amounts of contrast in the area I want people to focus on. I know its a pretty basic compositional thing to forget, but its something I frequently forget to do. So from now on I’m going to try keep it in mind more often.

Anyway, that’s all for this week. Making this background was a bit of a level up moment for me, so if you’ve had any level up moments in pixel art, design or anything really I’d love to hear them! Until then, take care.

Hi, sorry for missing last week’s devblog. Was just working on stuff that wasn’t very interesting to show off, so I decided to leave it be. But this week we have some fun stuff to look at!

First up is World 3 is in the game!World3Animated.gif
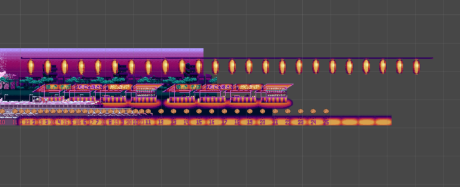
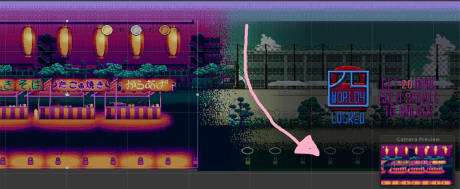
Well, at least the art assets are in the game. Getting the art in can be a bit arduous. First thing I have to do is position all the sprites so that they line up with the previous world’s sprites, then I have to create a new parallax manager for this world. All this does is it manages the different layers and makes sure they move the right amount. Then I have enter in all the sprites into the correct layer and set the movement modifier for each layer. Its just one of those things that isn’t complicated but just takes more time than you think.

Speaking of things that aren’t complicated but are time consuming: Pallet Swapping. So something I do for each world is I create new color variations on my UI. This is so my UI matches the color of whatever world the player is in.

This is not a complex task, but boy is it ever mundane. Open file, select color, replace color with new color, repeat for remaining colors, save, repeat for the next 80 something UI elements. Doing all the UI recolors took me about 75% of a full day to finish. The evening that I finished doing them I was talking to a friend and realized that if it took me most of a day to do the recolors if I had to repeat that process 15-20 more times that would take up most of a month to do. Not great. So I had an idea, I’m going to spend a day or two making a unity plugin that automates the process for me. You just give Unity all the files you want it to modify, each of the colors in the original sprite, each of the new replacement colors, where everything should be saved, and what naming convention it should apply. And when all is said and done I should even be able to sell it on the Unity Asset Store for a buck or two.

Finally I got the bare-bones of the next mechanic into the game. OneDirectionTilesVer1GIF

These are One Direction Kana. They can only move in one direction… also they love Harry Styles. They are “functionally” complete in that you can’t make any invalid moves with them but the game currently lets drag the Kana in the direction of an invalid move, it just then pops it back to where it began because it was an invalid move. I’m also not completely sold on the visuals of the mechanic yet, but hey its a placeholder so it will change soon enough. Anyway I decided to make this mechanic the next mechanic because its a pretty simple mechanic for the player, and it doesn’t have a requirement of learning more Kana to make the mechanic work (unlike the Mystery Kana). This is important as the start of Kana Quest has a really high learning curve, and I need to give the player a breather and some time to revise the Kana they’ve seen.

So before I head off, next week (23rd/24th) will be the LAST Dev Blog for 2017 (as the following Saturday will be my birthday and the day after that is new year’s). So what we’re going to do is, take a look at what’s changed with Kana Quest since I’ve been working on it full time. Just to see how far we’ve come.

Anyway, until then, Have a great weekend and Happy Holidays!